
Unmanaged devices are most of the time a weak point in the corporate network/ environment. With the current situation more and more BYOD devices are connected to the enterprise network environment. With the new Defender for Endpoint Discovery functionality, it is possible to scan and protect the corporate network for unmanaged devices.
With the new Endpoint Discovery functionality it is possible to discover unmanaged devices from the Enterprise network.
What is the current challenge?
Currently multiple toolings like Endpoint Protection (EPP) and Detection and Response (EDR) are available. With the rise of unified SIEM and XDR (extended detection and response) solutions, like Microsoft 365 Defender the protection layer is improved in the last few years. The only issue before the new announcement is the availability of unmanaged devices and ‘bring your own’ devices. In the currency pandemic situation more and more BYO devices are connected inside corporate networks. Without security protections and toolings like Defender for Endpoint a large risk.
From solutions like Intune it is possible to manage all the corporate-managed devices with a modern security solution. The risky part is the unmanaged devices connected to the enterprise network. These unmanaged devices that are connecting to company networks present a huge opportunity for attackers to compromise these devices and launch broader attacks.
In this blog all the information about the new Unmanaged Endpoint Discovery functionality inside Defender for Endpoint.
What is Unmanaged Endpoint Discovery?
The new unmanaged endpoint discovery functionality is currently in public preview and available. With the new features it is possible to scan for unmanaged endpoints inside the corporate network.
Based on the scan a new security recommendation is available for onboard the unmanaged endpoint to protect the endpoints with the Defender for Endpoint (EDR) solution.
With the Endpoint Discovery functionality two new discover methods are available; Standard and Basic:
Basic: With the use of unicast onboarded Defender for Endpoint devices discover the network for unmanaged endpoints. The basic discovery uses the SenseNDR.exe binary for network data collection.
Standard Discovery: The recommended way is the standard discovery functionality. This is an active discovery method where the managed devices actively probe the network to identify unmanaged devices. With the Standard Discovery the threat, vulnerability and metadata value will be discovered. Standard mode uses smart, active probing to discover even more information about observed devices to enrich existing device information.
Standard discovery uses various PowerShell scripts to actively probe devices in the network. Those PowerShell scripts are Microsoft signed and are executed from the following location: C:\ProgramData\Microsoft\Windows Defender Advanced Threat Protection\Downloads\*.ps. For example, C:\ProgramData\Microsoft\Windows Defender Advanced Threat Protection\Downloads\UnicastScannerV1.1.0.ps1.
The basic view gives limited visibility of unmanaged endpoints. One big advantage of the standard discovery is the add-on for TVM-data.
How to start?
By default the Defender for Endpoint environments with the preview features has the new Endpoint Discovery functionality. The default value is the basic discovery. On May 10, the basic discovery will be automatically switching to Standard Discovery when the end-user created no changes for specifying the discovery type.
Check the activation:
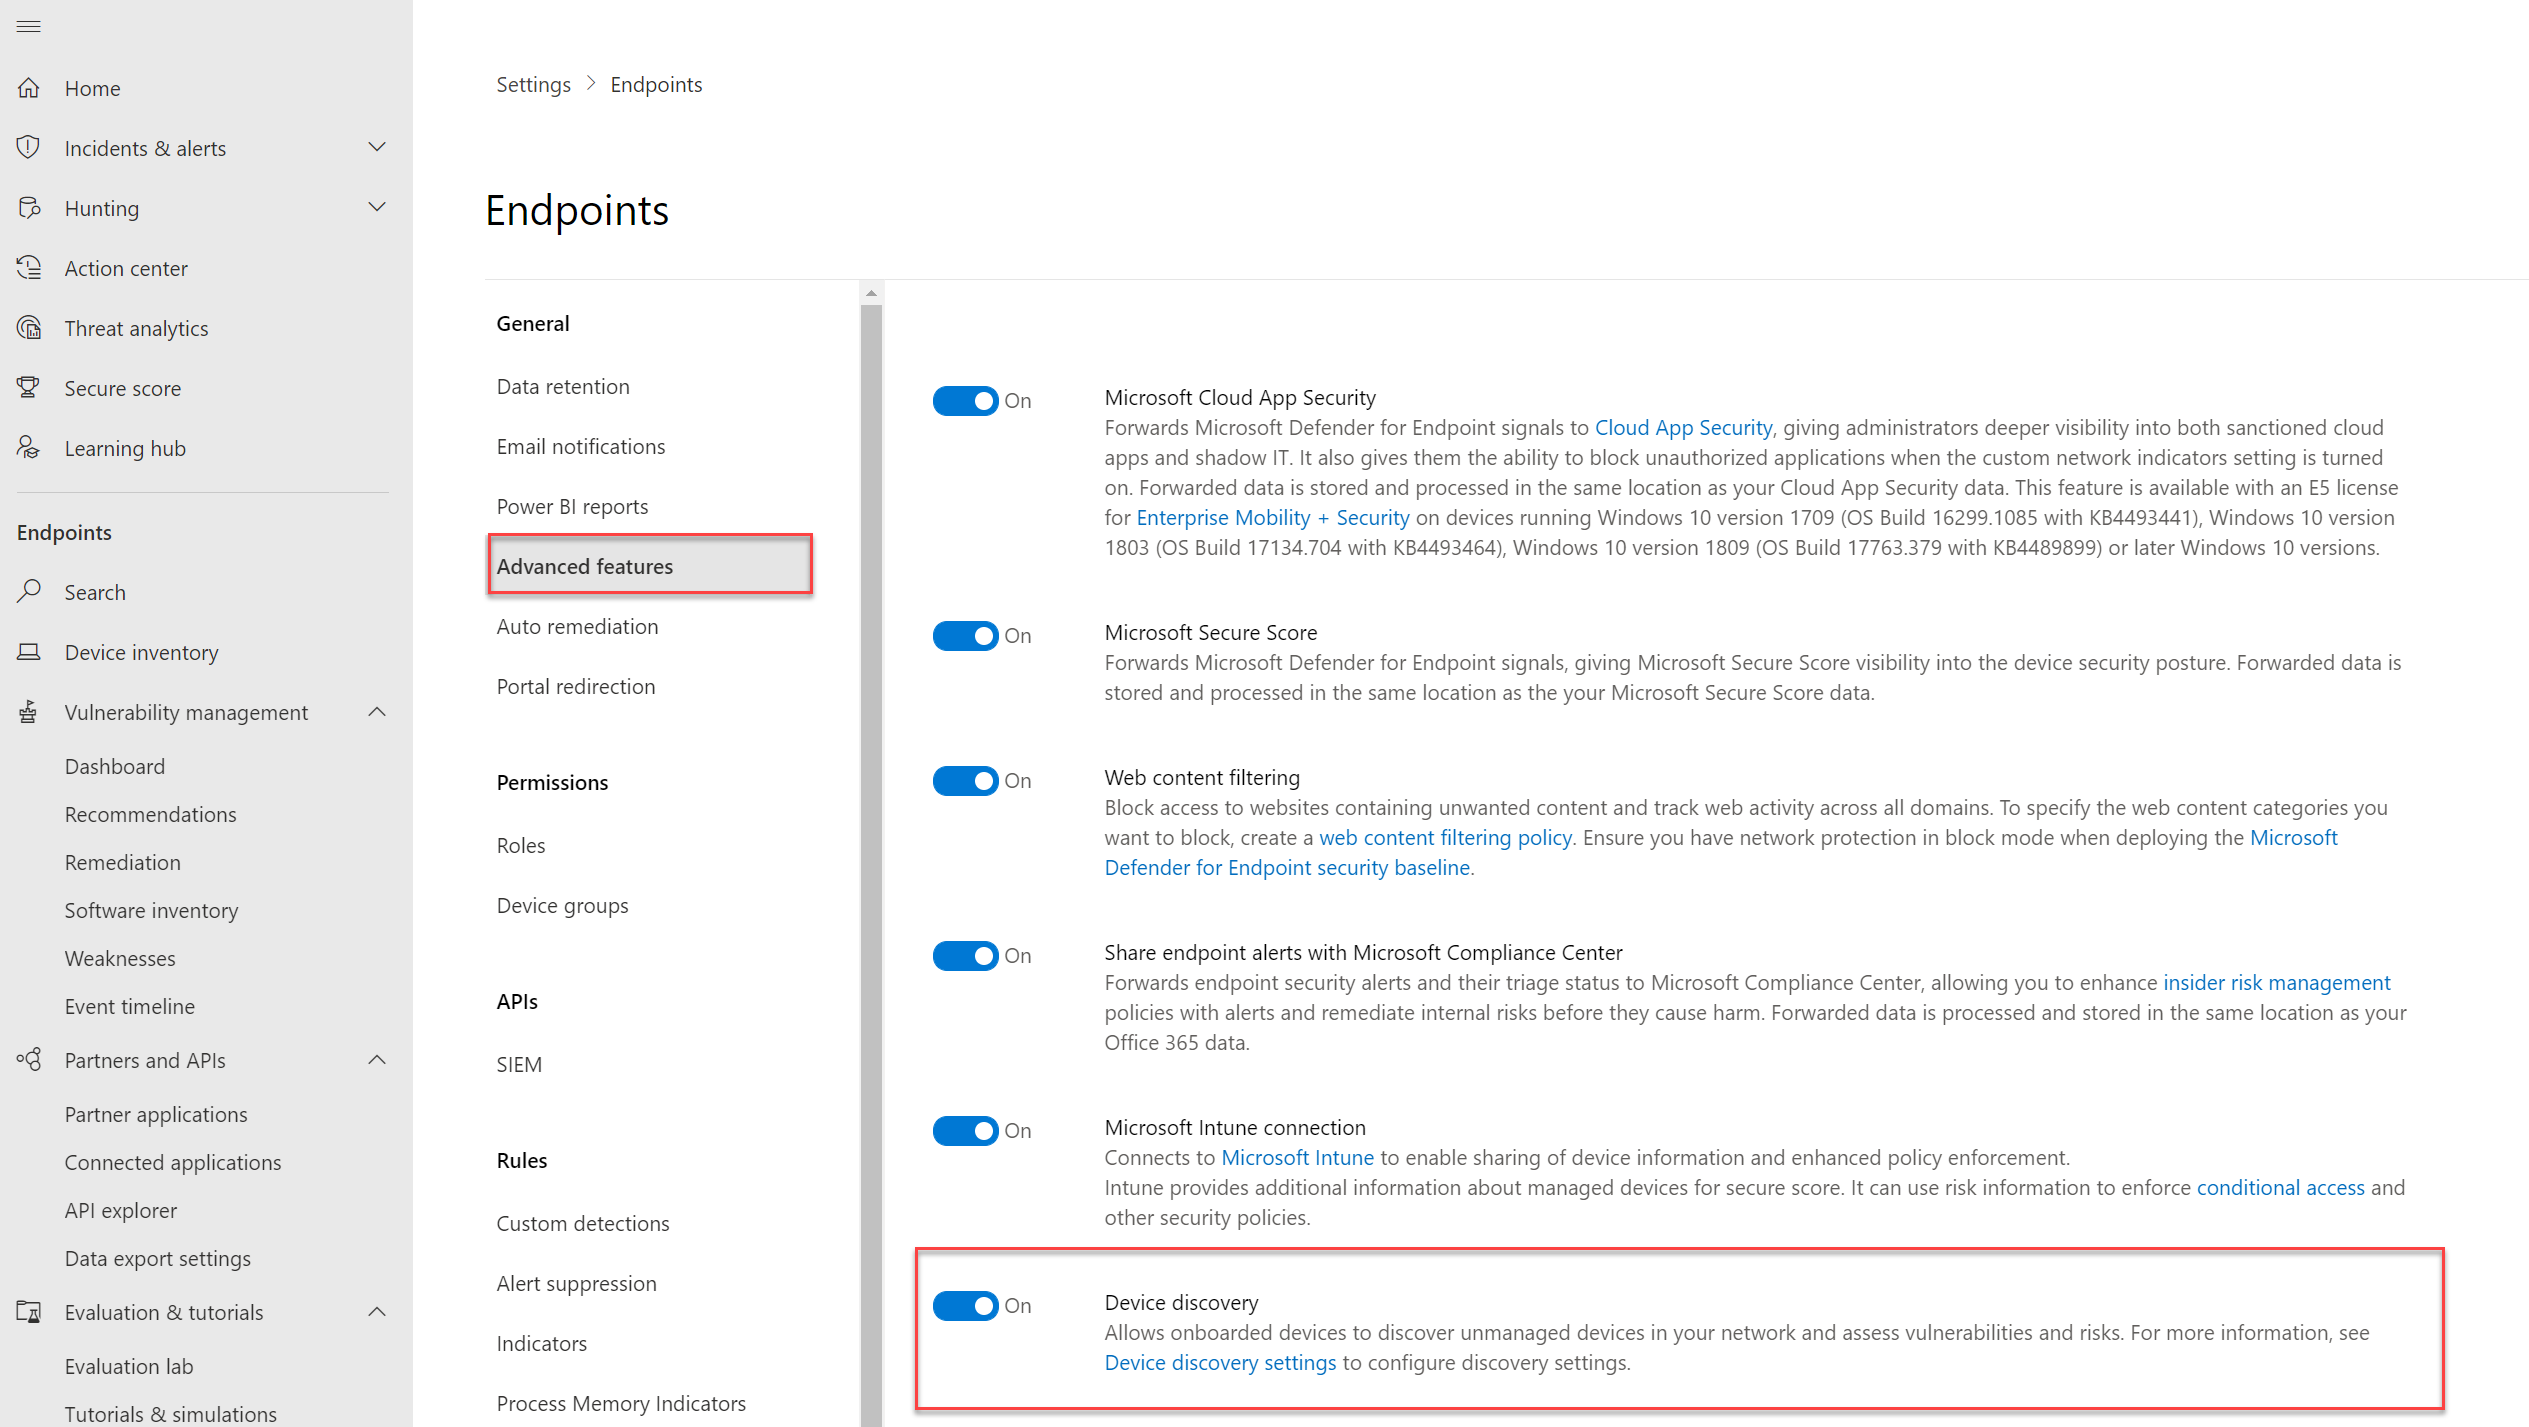
By default the function is enabled. For checking the activation:
- Go to security.microsoft.com
- Open Settings -> Endpoints
- Open Advanced Feature
- Check for the value Device discovery
For checking or change the Discovery mode:
Direct setting URL: Microsoft 365
- Go to security.microsoft.com
- Open Settings -> Device discovery

Now you have multiple options for setting up the Discovery mode. First you have the Discovery setup. With the Discovery setup it is possible to configure the discovery mode. For the discovery there is a basic and standard method.
- Basic
- Standard discovery
For the advanced information view the standard discovery is recommended. Standard discovery uses the smart active device probing features from already onboarded devices. (Windows 10 1809 minimal)

When you enable Standard discovery, the default mode is that all managed Windows 10 devices perform this task. With the tagging feature it is possible to restrict the execution of the Standard discovery process. With this you can enable Standard discovery for only the selected devices.
Good to know; if you using tagging from the registry value it is not available for selected Currently only the tags set via portal or API are supported.

Home networks and enterprise networks
For privacy reasons it is needed to scan only the corporate devices connected to the enterprise network. Most of the devices are connected to work and also home networks. Microsoft built for this a specific internal logic to automatically identify enterprise networks. With this the onboarding is automatically based for only the corporate environment.
From the settings multiple options are available for excluding and optimize the scan.
Exclusions
From the Device discovery page it is possible to add IPs or subnets to exclude devices from being proactively discovered. For example; you can exclude honeypot systems or sensitive devices.
Exclusions help prevent devices from being found during proactive discovery.
For adding Device discovery exclusions:
- Go to: Microsoft Security Device Discovery setting page
- Click add exclusion
- Fill in the IP or subnet
- Save the exclusion

Control the monitored networks
The list with monitored networks shows the detected corporate or private networks. From the options you can ignore the network or select the internal discovery classification.
Choosing the initial discovery classification means applying the default system-made network monitor state. Selecting the default system-made network monitor state means that networks that were identified to be corporate, will be monitored, and ones identified as non-corporate, will be ignored automatically.
- Select Settings > Device discovery.
- Select Monitored networks.
- View the list of networks.
- Select the three dots next to the network name.
- Choose whether you want to monitor, ignore, or use the initial discovery classification.
Note: If you choosing to monitor a network that was not identified by Microsoft Defender for Endpoint as a corporate network can cause device discovery outside the corporate network for non-corporate devices. With the option ignore a network; the monitoring will be stopped. Devices that were already discovered will not be removed from the inventory. Removal is only after the retention period of the Defender for Endpoint configuration.
The system differentiates between corporate and non-corporate networks by correlating common network interface identifiers among Microsoft Defender for Endpoint onboarded devices.

- Green: Private networks with the monitor state ignored (automatically)
- Red: Private network manually activated for monitoring
And for corporate detected networks:

Endpoint overview
New MDE endpoints that are discovered in the network are listed in the Endpoint tab of Device inventory. Within the Endpoint overview you can track the status with the new attribute called OnboardingStatus. The following onboarding status values are available:

- Onboarded The endpoint is onboarded to Microsoft Defender for Endpoint
- Can be onboarded The endpoint was discovered in the network and the Operating System was identified as one that is supported by Microsoft Defender for Endpoint, but it is not currently onboarded
- Unsupported The endpoint was discovered in the network but is not supported by Microsoft Defender for Endpoint
- Insufficient Info The system could not determine the supportability of the device. Enabling standard discovery on more devices in the network can enrich the discovered attributes for the scanned devices.

Security recommendations
The data is used as part of the security recommendations within threat and vulnerability management. From the Security recommendations the new recommendations are listed under: “Onboard devices”

Use the advanced hunting
Advanced hunting can be used to query the new value from the DeviceInfo table in the Advanced hunting section. Example KQL query for the value: Can be onboarded
From advanced hunting it is possible to create a new detection rule. With this you can get an incident notification if there is a new unmanaged endpoint is detected. From the incident view you can manage the installation. 
And the result:

For creating a new detection rule. Click on Create detection rule

Dashboard tiles
From the Microsoft 365 security console two new tiles are available. The first shows “Devices to onboard” and gives all devices seen in the last 30 days for onboard. The check is based when the device has been seen more than just once over a 3-day period. This prevents the recommendation for single-used devices inside the network.

The second tile is the “Discovered devices in my network” and shows the discovered devices in different device types. Devices types:
- Desktop
- Server
- Mobile
- Tablet
- Unknown

With the new Endpoint Discovery feature you can protect unmanaged endpoints discovered inside the corporate network.
Common questions
Which onboarded devices can perform discovery?
Onboarded devices running on Windows 10 version 1809 or later can perform discovery. All devices with minimal Windows 10 1809 are used for discovery.
Which protocols are used for active probing in Standard discovery
When a device is configured to run Standard discovery, exposed services are being probed by using the following protocols: ARP, FTP, HTTP, ICMP, LLMNR, NBNS, RDP, SIP, SMTP, SNMP, SSH, Telnet, UPNP, WSD, SMB, NBSS, IPP, PJL
Sources
Microsoft: Endpoint Discovery – Navigating your way through unmanaged devices
Docs Microsoft: Device discovery overview
4 Comments
Leave a Reply

Thank you for this article, Jeffrey. From my understanding, it seems that the device discovery settings, particularly those related to excluding specific IP addresses, cannot be configured prior to activating device discovery within the endpoint settings. My expectation was that I’d first be able to specify the subnets I intended to scan, subsequently select a device tag to delineate the devices to be scanned, and then proceed to enable the scanning function.
However, my experience was different. Upon activating Device Discovery in the Endpoint settings, I noticed that approximately five devices immediately began scanning multiple IT/OT subnets within just a few minutes. This occurrence was a bit alarming as I aim to have granular control over which subnets are scanned and when. I would greatly appreciate your insights and perspective on this issue.
Currently we have basic discovery configured and it is discovering devices in the network, however MDE doesn’t find any weaknesses on these discovered devices.
Will standard discovery find weaknesses on discovered devices or can this only be achieved with the authenticated scanner?
Not sure – expect the discovery of weaknesses is only possible with the more advanced standard discovery – when the device is supported by vulnerability management.
Checked multiple enterprise environments; where weaknesses were discovered with the standard discovery configured.
Hi, please share the Microsoft source for protocols used for active probing in Standard discovery – ARP, FTP, HTTP, ICMP, LLMNR, NBNS, RDP, SIP, SMTP, SNMP, SSH, Telnet, UPNP, WSD, SMB, NBSS, IPP, PJL. Thank you!