It is time for part 3 of the ultimate Microsoft Defender for Endpoint (MDE) series. After part 2 (configuration MDE) we are now going to deep-dive more into the initial onboarding of Defender for Endpoint. In part 2 the question; how to configure Defender for Endpoint service settings is answered – view the previous part here.
Important: Defender AV/ Next Generation Protection onboarding is critical and part of the complete protection platform. All AV/ Next Generation Protection information will be explained more in-depth including migration from other AV/ Passive mode/ EDR block and more.
Introduction blog series
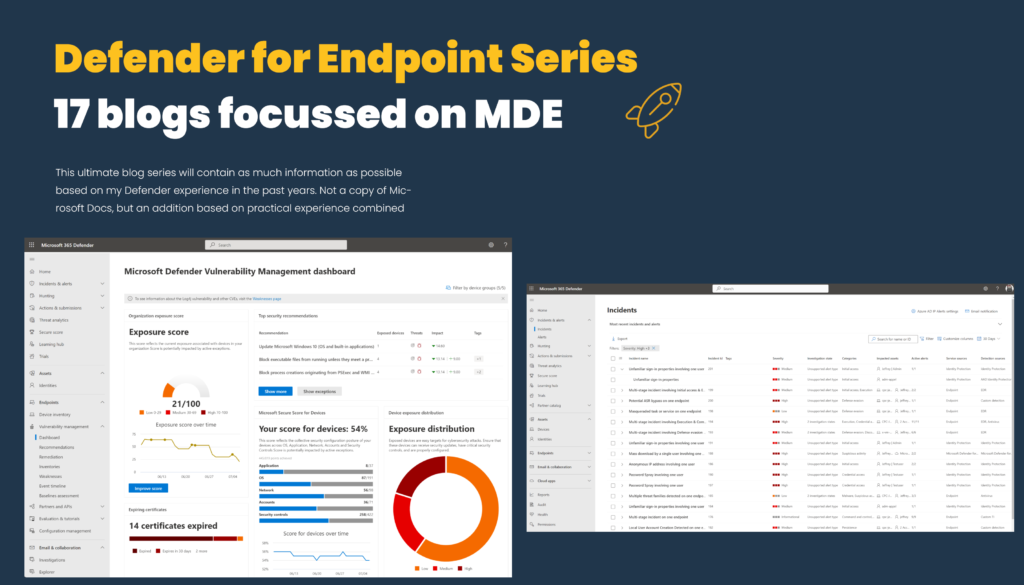
This ultimate blog series will contain as much information as possible based on my Defender experience in the past years. Other platforms like iOS, Android, Linux, and macOS will follow when it’s a success.
NOTE: Blog series is focussing on features in Microsoft Defender for Endpoint P2 all Microsoft Defender for Endpoint P1 features are available in P2.
Specific question or content idea part of Defender for Endpoint? Use the contact submission form and share the post ideas.
Prerequisites
Defender for Endpoint needs some prerequisites for correctly using the services. To avoid onboarding problems, start configuring the prerequisites and validate the configuration based on some machines.
View all prerequisites here: Minimum requirements for Microsoft Defender for Endpoint
Network
Internet connectivity on devices is required directly or through a system proxy. The Defender for Endpoint sensor requires Microsoft Windows HTTP (WinHTTP) for communication with the Defender for Endpoint service. Defender for Endpoint sensors runs in system context based on the LocalSystem account.
It is recommended to validate the service domains and confirm access to Defender for Endpoint service URLs
The following downloadable spreadsheet lists the services and their associated URL that must be available for each endpoint. Confirm there are no firewalls or created network filtering rules blocking the URLs. Download the commercial spreadsheet here
The spreadsheet contains multiple geography URLs, open all URLs where the geography column is WW and the specific location where Defender data is located (data storage location) – View part 2 for more information.
Important: HTTPS scanning / SSL inspection is common in larger environments. When using HTTPS scanning make sure all URLs are excluded from the SSL inspection technique.
For devices with no direct internet connection, the use of a proxy solution is recommended. Previously it was possible to use MMA-based solutions and the OMS gateway. With the new modern Defender for Endpoint client it is possible to configure MDE using a proxy configuration.
For Windows devices, see Configure device proxy and Internet connectivity settings
When there is no direct internet configuration it is possible to send all the telemetry information via the proxy. Recommended read is the blog published by Brian Baldock:
- Defender for Endpoint and disconnected environments. Which proxy configuration wins?
- Disconnected environments, proxies and Microsoft Defender for Endpoint
Streamlined connectivity type
Microsoft improved the connectivity type of Defender for Endpoint with a new onboarding type. The new onboarding type is called streamlined and is currently available in preview. The new improved packages allow devices to be onboarded using the streamlined connectivity method, with the new method Microsoft created a new simplified domain *.endpoint.security.microsoft.com. The domain replaces the following services:
- Cloud Protection/MAPS
- Malware Sample Submission Storage
- Auto-IR Sample Storage
- Defender for Endpoint Command & Control
- EDR Cyberdata
More information: Onboarding devices using streamlined connectivity for Microsoft Defender for Endpoint | Microsoft Learn
Diagtrack
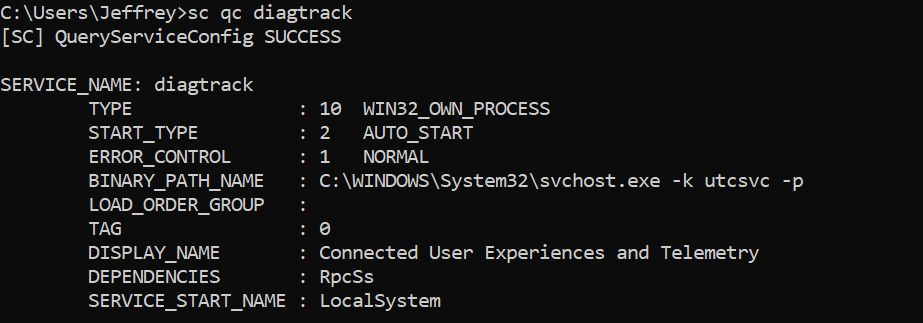
Windows diagnostic data service must be enabled and configured in start_type: AUTO_START. Validating is possible using:
sc qc diagtrackWhen not configured correctly use the following command to set the service to automatically start:
sc config diagtrack start=autoValidating pre-requisites using Client Analyzer
The Client Analyzer can be used for validating the prerequisites. The Client Analyzer can run with or without Defender for Endpoint actively installed.
Download the client analyzer directly: https://aka.ms/mdeanalyzer
- Unzip the download
- Run MDEClientAnalyzer.cmd as admin
- Open folder MDEClientAnalyzerResult
View the MDEClientAnalyzer.HTM file. When onboarded the results page shows more in-depth information including Organization ID/ Device ID/ SENSE ID and EDR information.

During the pre-onboarding, it is more interesting to view the MDEClientAnalyzer.txt file in the SysteminfoLogs folder for the details of the analyzer script execution. MDEClientAnalyzer.txt contains more in-depth information and the network test
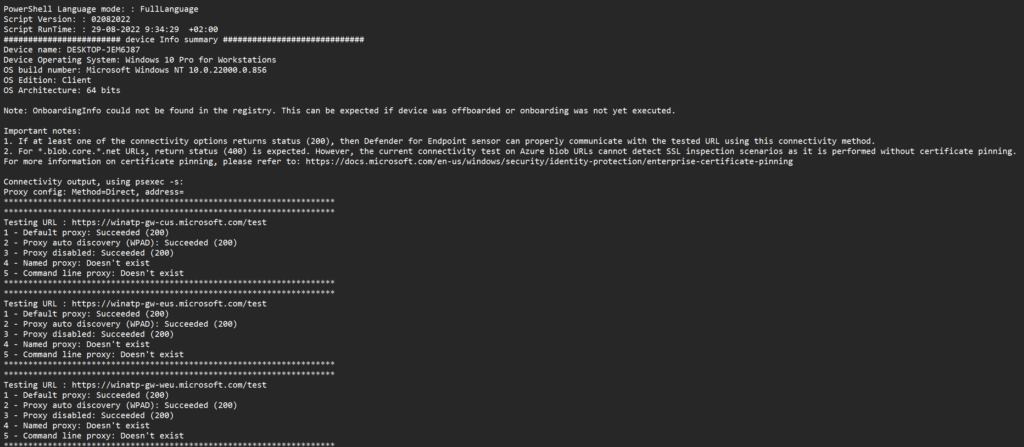
More information: Run the client analyzer on Windows
Onboarding methods Defender for Endpoint
Microsoft Defender for Endpoint can be onboarded using multiple methods, which will be explained in this part of the series. For customers evaluating Defender for Endpoint, the evaluation lab can be used for onboarding some machines and testing Defender for Endpoint.
The following tools can be used for Windows:
| Onboarding methods Windows |
|---|
| Local script (PowerShell) |
| Group Policy |
| Microsoft Endpoint Manager |
| Microsoft Endpoint Configuration Manager |
| VDI scripts |
| Onboarded using Defender for Cloud integration |
Of course – sometimes customers use different platforms; most of the time the Group Policy script can be used easily via other deployment toolings like for example; Altiris, DesktopCentral, and Ansible for Windows.
Update 3 August 2022 Announced August 3, 2022; Microsoft announced the following: Announcement Microsoft Defender for Endpoint for Servers removal from the price list. There are upcoming changes to our server protection offering. Source.
Update June 2023; Microsoft announced the new Direct onboarding to onboard machines without Azure Arc directly to Defender for Endpoint via the Defender for Servers P1 plan.
With the new feature called Direct onboarding, it is possible to onboard on-premises Windows and Linux servers to Defender for Servers without Azure Arc. This means we can deploy Defender for Endpoint from the M365 Defender portal using the onboarding package/ script – and have billing through Azure/ Defender for Cloud. Without the new for additional agents/ extensions or products.
The new method supports the same degree of data integration between MDC and MDE in comparison with the Azure Arc/ Defender for Servers method.
Based on my own opinion, the advice is the following:
| OS | Platform | Recommended onboarding |
|---|---|---|
| Windows 10/11 | On-premises | Intune |
| Windows 10/11 | Cloud | Intune |
| Windows Cloud PC | Cloud | Intune |
| Windows Server 2012R2/ 2016 | On-premises | Defender for Cloud integration using Azure Arc or direct onboarding |
| Windows Server 2012R2/ 2016 | Cloud | Defender for Cloud integration |
| Windows Server 2019 and higher | On-premises | Defender for Cloud integration using Azure Arc or direct onboarding |
| Windows Server 2019 and higher | Cloud | Defender for Cloud integration |
Personally; Intune and Defender for Cloud enable multiple modern features which enable direct modern management. When using still “legacy” methods like Group Policy it can be advised to use more modern solutions. Of course; sometimes there is no option to use Azure Arc/ Defender for Cloud / Intune where methods like Microsoft Endpoint Configuration Manager or Group Policy can be used. Common situations are based on Retail/ POS which are more strict for cloud-based solutions. For some environments, GPO is still the best way to manage devices.
I often get the question; Defender for Cloud is more expensive in comparison with the Defender for Endpoint Server licensing? – It was more expensive some months ago and of course, enables more features (FIM, Adaptive network hardening, Qualys vulnerability assessment, Just-in-time VM access, TVM add-on, and more).
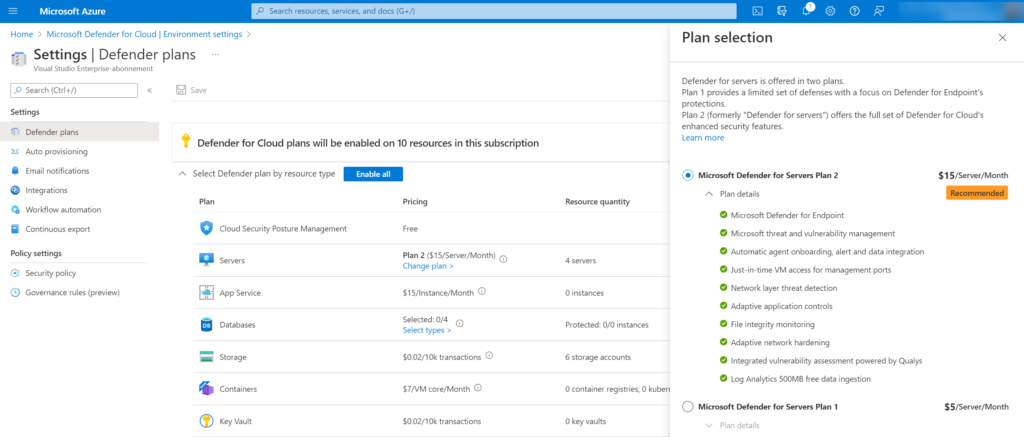
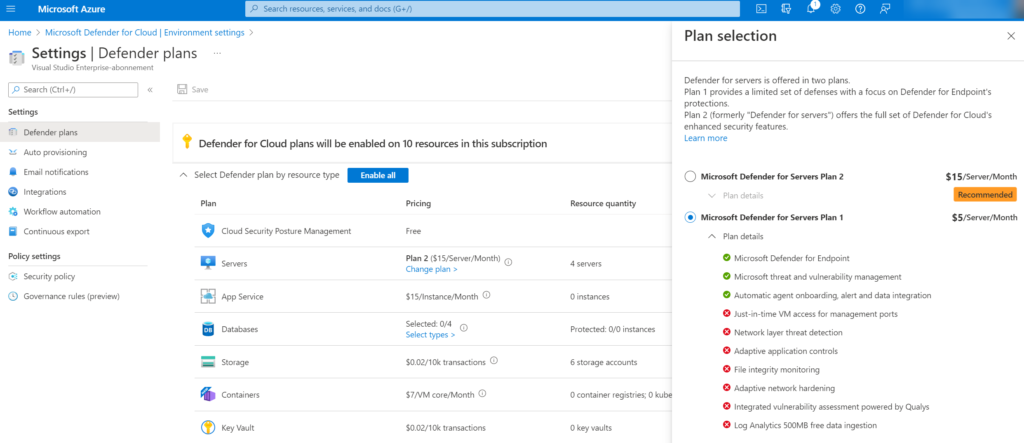
Currently, there are two plans (Defender for Servers P1 and P2). Defender for Endpoint P1 is currently $5/Server/Month. The P1 $5 pricing makes it way more interesting for onboarding only Defender for Endpoint.
P2 plan:
P1 plan:
Difference between Defender for Servers/ Defender for Cloud
Common question; What is the difference between Defender for Endpoint, Defender for Cloud, Defender for Server, and Azure Arc? And why do we need all components when deploying Defender for Endpoint on servers? Let’s explain it more in-depth.
Defender for Cloud is a Cloud-native application protection platform based on Cloud Security Posture Management (CSPM) and Cloud Workload Protection Platform (CWPP).
Defender for Cloud offers multiple Defender plans for more in-depth security. Available plans:
– Defender CSPM
– Defender for Servers
– Defender for App Service
– Defender for Databases
– Defender for Storage
– Defender for Containers
– Defender for Key Vault
– Defender for Resource Manager
– Defender for DNS
The Defender for Servers plan is part of Defender for Cloud and is available in two pricing models; P1/ P2. P1 focussed on a limited set of defenses with a strong focus on Defender for Endpoint technology. P2 contains the full set of Defender for Cloud-enhanced security features including for example; Network layer threat detection, FIM, Qualys vulnerability assessment, and 500MB free data ingestion.
P1=$5 Server/Month (calculated for running time/hour)
P2=$15 Server/Month (calculated for running time/hour)
When you have Microsoft Defender for Severs Plan 1, it includes Microsoft Defender for Endpoint Plan 2. Both P1/ P2 contain all features of Defender for Endpoint P2.
By integrating Defender for Endpoint with Defender for Cloud, it gives the following benefits:
- Automated onboarding
- Azure Arc (On-Prem) can be easily deployed using Defender for Cloud
- The Defender for Cloud portal pages display Defender for Endpoint alerts
After enabling the Defender for Endpoint integration in Defender for Cloud machines will be provisioned. The configuration/ installation is pushed using Azure Policies and contains the onboarding script and additional configuration. The result is the MDE.Windows VM extension for Windows Server 2012R2 and higher.
Azure Arc functions as a bridge that extends the Azure platform to on-premises environments or other clouds (AWS/ GCP). For connecting servers with Azure Arc, it is necessary to use Azure Arc-enabled servers and the Azure Connected Machine agent on supported systems.
In simple terms;
1: In Defender for Cloud
2: Is the plan Defender for Servers P1 or P2 enabled
3: Which onboards Defender for Endpoint P2 via Azure Policy
Direct onboarding (for servers)
Azure Arc is no longer a requirement for the onboarding of Windows Servers, and is now optional with benefits of extra features (FIM/ AMA agent). This means we can onboard Defender for Endpoint on servers via the onboarding options in MDE (GPO/ MECM) and use direct onboarding for the licensing capabilities.
jeffreyappel.nl
Previously it was always needed to use the Defender for Servers method for getting the license for servers since the standalone license was removed some time ago. With the license decision, it was needed to enroll Azure Arc for non-Azure resources like on-premises machines or machines hosted in another cloud. With the new onboarding method Azure Arc is no longer required when onboarding machines to Defender for Endpoint.
Now the question what is the best onboarding method?
There is still a benefit of Azure Arc since Azure Arc enables a couple of features that are not part of the new direct onboarding (P2 features + Arc features). When machines are hosted in Azure it is common to use the Defender for Servers onboarding method, since the provisioning is automatically via the MDE.Windows and MDE.Linux extension. When needed the collection of events is always needed to use the Azure Arc agent for servers, since the Azure Monitoring Agent (AMA) is only supported via Azure Arc.
Direct onboarding method
In situations where Azure Arc is a huge overhead (it requires its own security/ policies and design decisions), it is possible to use the new direct onboarding method. With the newly announced direct onboarding, there is a seamless integration between Defender for Endpoint and Defender for Cloud without the need for additional deployment of agents. Once enabled, the machines part of Defender for Endpoint is synced to Defender for Cloud inventory in a designated Azure Subscription that is configured.
With the use of Direct onboarding the Defender for Cloud part is only used for licensing. The Azure Subscription is used for licensing, billing, alerts, and insights. For additional configuration and protection, it is needed to use Azure Arc.
The enablement of direct onboarding is an opt-in setting that needs to be enabled on the tenant level. After enabling it affects existing and new servers that are onboarded in the Defender for Endpoint tenant part of the tenant. After enabling the new onboarding machines will be synced under the designated subscriptions and pricing will be part of the Defender for Cloud process.
Difference in platform
Previously onboarding for Server 2012R2/ Server 2016 was only possible using the Microsoft Monitoring Agent. Currently, the new unified agent is available for Server 2012R2 and 2016. In comparison with Server 2019, the onboarding process was quite complex with the Microsoft Monitoring Agent. The MMA agent was required as the EDR sensor wasn’t built-in, for Server 2016 en Server 2012R2.
Tip: Always go for the new unified installer, do not use the Microsoft Monitoring Agent for Windows Server 2012R2 and Server 2016, since this is missing a large set of features and detections.
Server 2016 is by default installed with Microsoft Defender Antivirus. For Server 2012R2 there was no installed AV by default, and you had to install System Center Endpoint Protection (SCEP). With the Microsoft Monitoring Agent and Defender AV/SCEP, there were still some missing protection features – like Attack Surface Reduction, Automated Investigation, Network Protection, and many more protection features.
Currently in general availability is the new unified solution for Server 2012R2 and Server 2016. More information can be founded here: Install the new unified Microsoft Defender for Endpoint agent on Server 2012R2 and 2016 | Jeffreyappel.nl
The new agent makes the onboarding different for multiple OS versions:
| OS | EDR sensor | Pre-requisites |
|---|---|---|
| Windows 10/11 1607+ | Build-in | None |
| Windows Server 2012R2 | Part of installation | Unified agent installed |
| Windows Server 2016 | Part of installation | Unified agent installed |
| Windows Server 2019 | Build-in | None |
| Windows Server 2022 | Build-in | None |
For Windows Server 2019+ and Windows 10 1607+, the EDR sensor is built-in and requires only the Defender for Endpoint onboarding script deployed and configured prerequisites.
When to use the different methods for servers
In general, there are now three options:
- Onboard via Azure Arc
- Onboard via Defender for Servers
- Onboard via direct onboarding
Azure Arc
Azure Arc is not focused on only Defender for Endpoint onboarding and contains more features for managing the machines with Azure services. With the use of Azure Arc it is possible to deploy and use Azure Policies, Update Management, Extensions, Automanage, and more.
When there is the need for collecting custom events via the Azure Monitor Agent it is needed to use Azure Arc for on-premises/ non-Azure machines.
When Azure Arc? When there is a use case for the management capabilities in Azure Arc or a requirement for collecting logs via the Azure Monitor agent.
Defender for Servers
Use Defender for Servers for machines hosted in Azure. With the use of Defender for Servers it is possible to deploy Defender for Endpoint automatically via the MDE.Windows or MDE.Linux extension. Customers can enable Defender for Servers P1 or Defender for Servers P2 and use all features.
When Defender for Servers? When machines are part of Azure it is easy to enable Defender for Servers. This gives flexibility in using/ securing machines with more advanced features like FIM/ JIT and more.
Direct onboarding
Direct onboarding is useful when Azure Arc gives an overhead and machines are hosted on-premises or in another cloud. With the use of direct onboarding, it is possible to deploy only Defender for Endpoint integrate alerts/ insights with Defender for Cloud, and get the license managed via Defender for Cloud. With the use of direct onboarding, there is no more a requirement for Azure Arc.
When direct onboarding? Direct onboarding is useful for only Defender for Endpoint and there is no need for Azure Monitor Agent deployment. When the Azure Monitor Agent is required; direct onboarding is not possible, since AMA requires Azure Arc for on-premises machines.
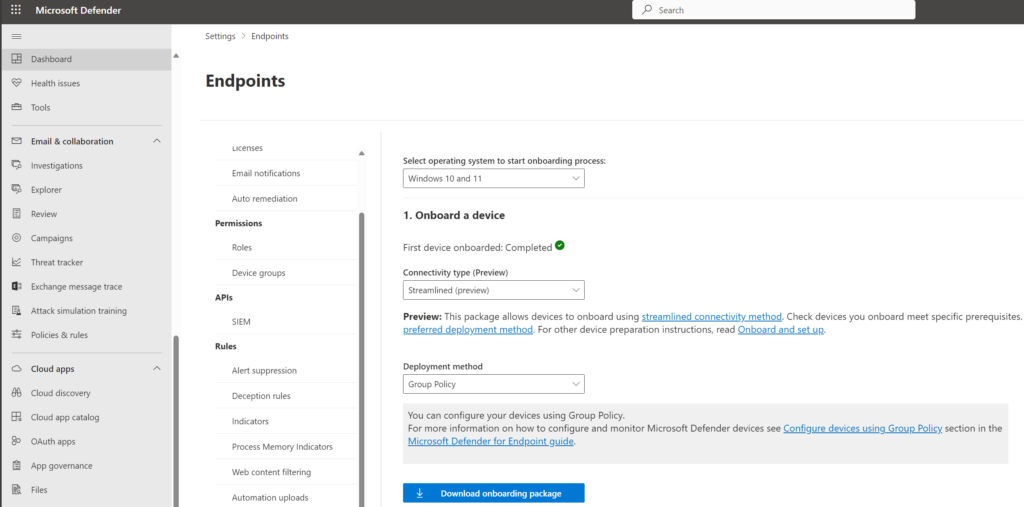
Where to download onboarding files?
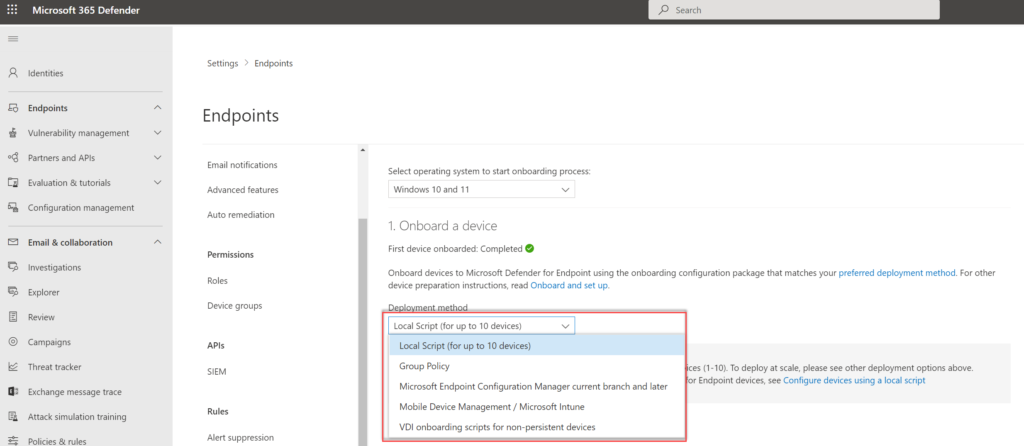
From the Microsoft 365 Defender portal, it is possible to download the installation and onboarding files that are needed.
For downloading onboarding files go to Security.microsoft.com -> Settings -> Endpoints -> Onboarding
The following deployment methods can be used:
- Local
- Group Policy
- Microsoft Endpoint Configuration Manager current branch and later
- Mobile Device Management / Microsoft Intune
Only when not using Defender for Cloud or Microsoft Endpoint Manager integrations it is required to download the onboarding files. Tip: When PowerShell is the only available option use always the Group Policy file (Local Script is not silent, and requires user input).
Tip: Update the file regularly. Microsoft updated the packages sometimes with improvements. For the unified agent always make sure to use the latest version when starting large deployments. Microsoft updated the agent frequently and included the latest product version and sense engine.
Note: Most of the available onboarding methods will be explained in the next parts.
Onboard simulation machines using evaluation lab
Starting mid-January 2024, Microsoft will retire the Defender Evaluation Lab. This change will rollout in mid-January 2024 and expects to complete by late January 2024. Below information is not available anymore – as alternative it is recommended to spin-up a test machine and launch different test simulations. Red Canary is recommended for testing AV components.
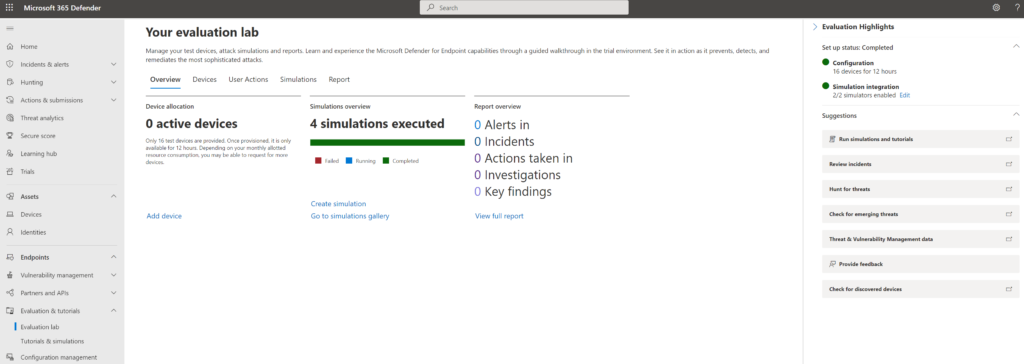
Defender for Endpoint evaluation lab is a great feature that allows evaluating Defender for Endpoint without configuration or any manual additional onboarding. With the Evaluation lab, it is possible to onboard pre-created machines or onboard domain-joined machines.
You can access the lab from the menu. In the navigation menu, select Evaluation and Tutorials> Evaluation lab.
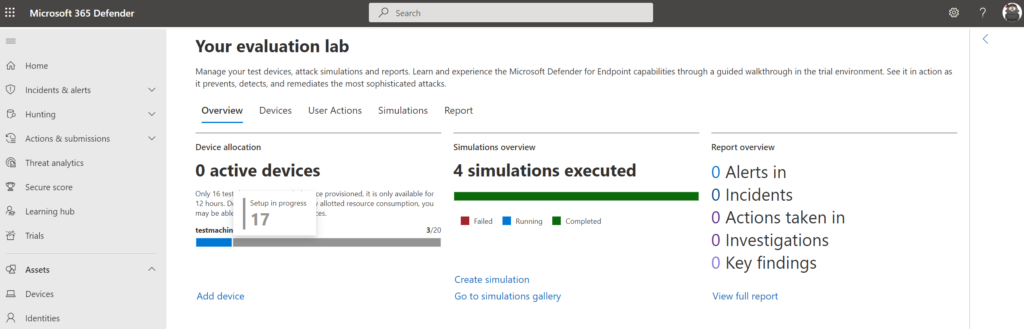
When accessing the evaluation lab for the first time within the Microsoft Defender ATP portal, you will see a welcome message. Click on Setup Lab to start setting up the lab environment. It can take some time before the environment is ready.
The test devices provided with the evaluation lab are only available for a limited duration, during the setup you have the option to configure devices for a specific set of devices/ available hours:
The setup is completed after some time and shows the option to add new devices using the button Add device
The following devices are currently available:
- Windows 10
- Windows 11
- Windows Server 2019
- Windows Server 2016
- Linux Ubuntu Server
Pro-tip: When choosing Server 2019 it is possible to onboard the machine as a Domain Controller. When the domain controller has been provisioned – it is possible to join Windows 10/Windows 11 machines to the domain.
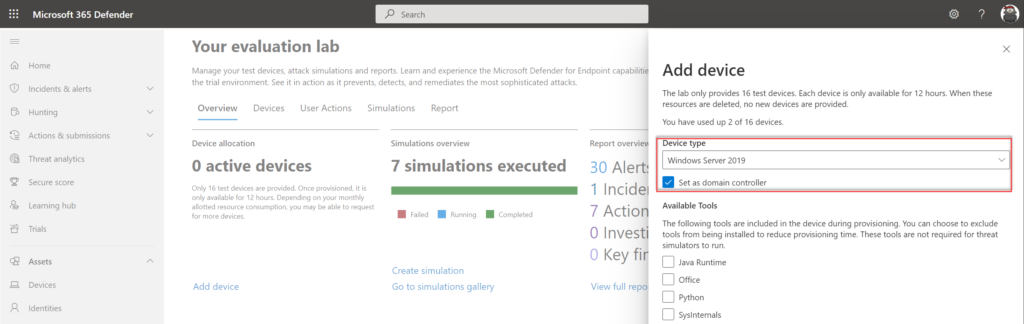
The following tools can be automatically included during the provisioning:
- Java Runtime
- Python
- Office
- Sysinternals
The following security components are pre-configured:
- Attack surface reduction
- Block at first sight
- Controlled folder access
- Exploit protection
- Network protection
- Potentially unwanted application detection
- Cloud-delivered protection
- Microsoft Defender SmartScreen
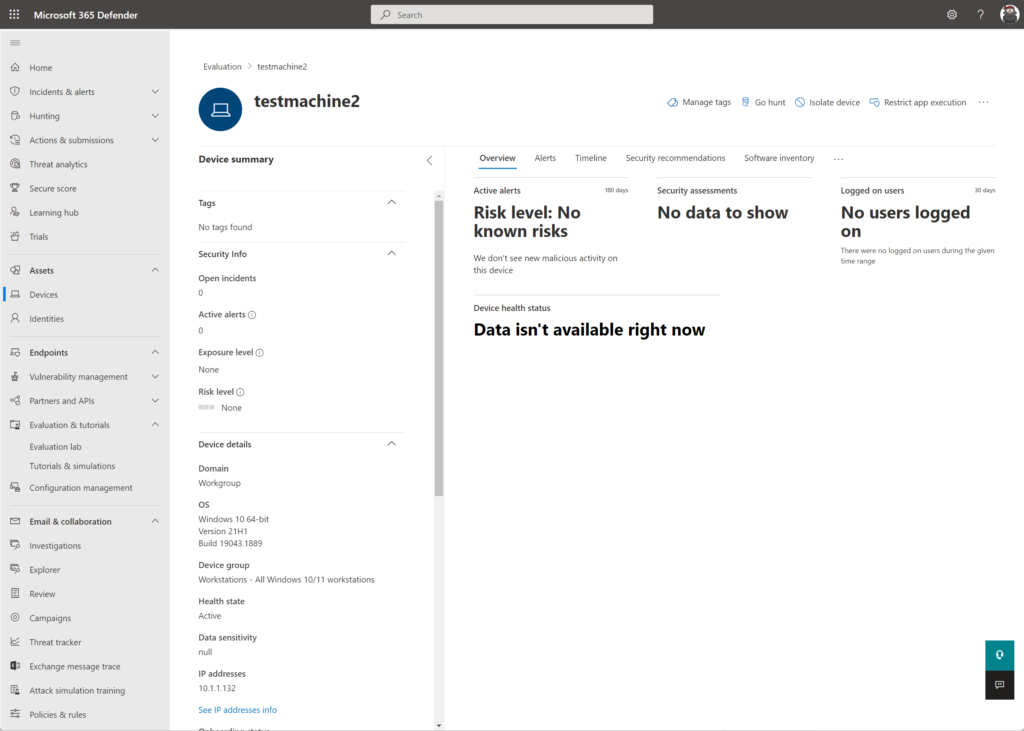
During the provisioning of a device, the machine is provisioned within Azure in a dedicated network. You can run any attack or use the pre-created simulations. Part of the provisioning is the onboarding of Defender for Endpoint with some basic pre-configured settings. Name convention of the test machines: Testmachine(number).
Important; The password is only displayed once. Copy the password. Reset of the password is possible, it takes some time.
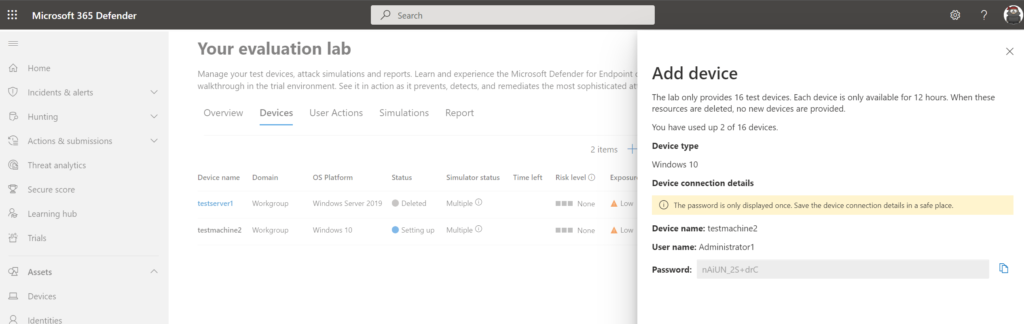
Defender shows the status: Setting up, it can take some time before the machine is correctly onboarded and provisioned (+- 15-30 minutes).
View the overview page for tracking the device allocation status.
After some time it is possible to connect using the RDP file and pre-created credentials.

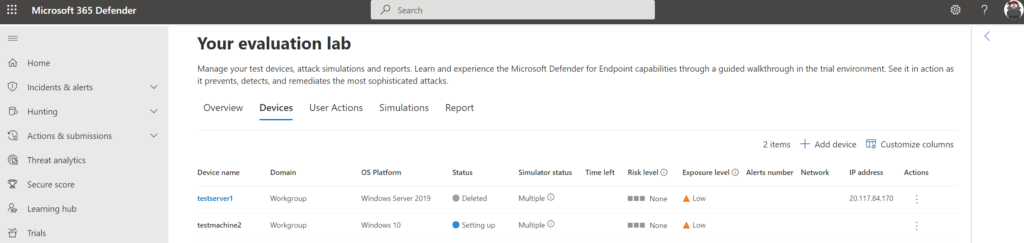
Defender for Endpoint Device Inventory shows the device and all information. The experience is the same in comparison with normal onboarded devices. All MDE device actions can be used. Run Get-MpPreference on the machine for viewing the actual configuration. By default, Cloud Protection is configured in High+ mode and ASR in audit mode.
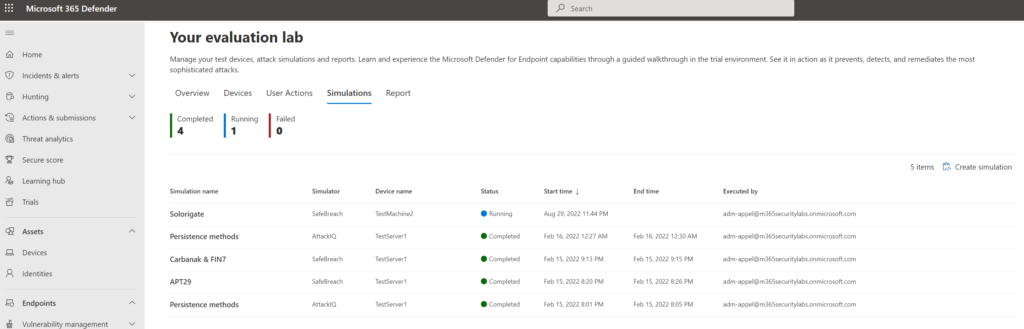
When the machine is ready and the simulation agent is installed – it is time for running some simulations via the simulation gallery. Multiple simulations from AttackIQ and SafeBreach are available.
Troubleshooting during onboarding
When devices are not visible in the portal more in-depth troubleshooting is possibly needed. When encountering issues it is always recommended to validate the MDE requirements.
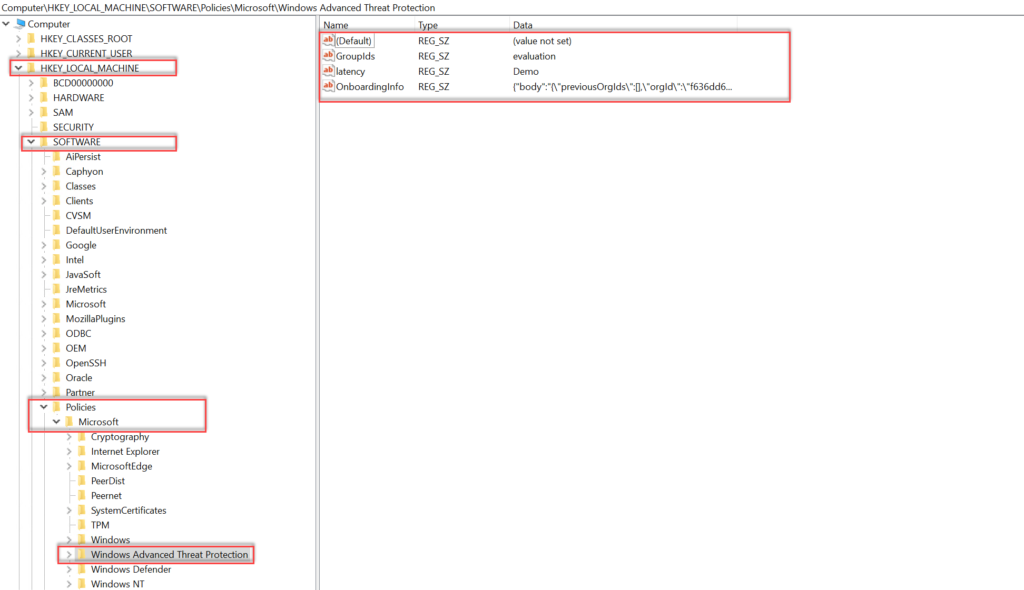
Onboarding information is visible in the registry: Computer\HKEY_LOCAL_MACHINE\SOFTWARE\Policies\Microsoft\Windows Advanced Threat Protection
Two recommended steps:
- Use MDEClientAnalyzer after onboarding to view connectivity/ sensor health/ service issues
- View the SENSE event log: Applications and Services Logs > Microsoft > Windows > SENSE
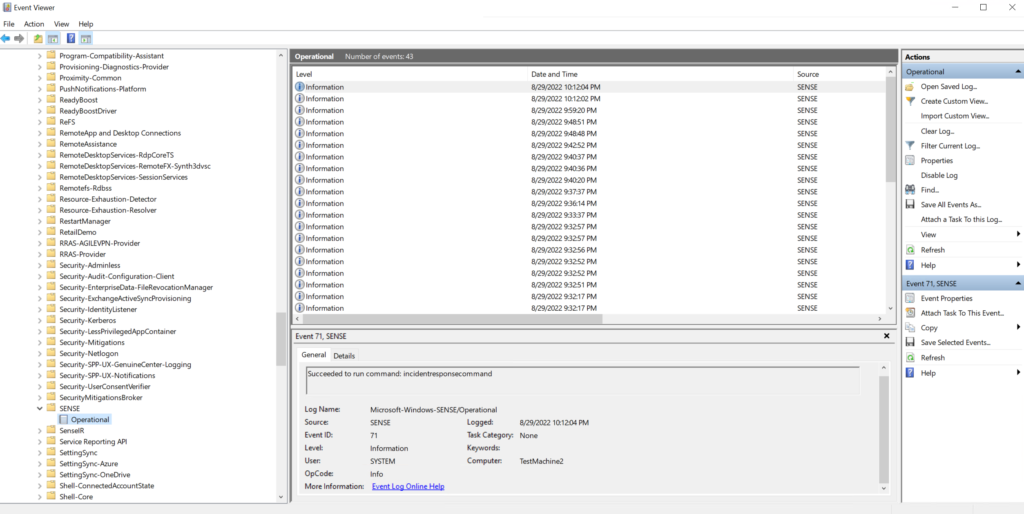
View all event ID parts of the SENSE service. View agent onboarding errors in the device event | Microsoft Doc
Devices in Defender for Endpoint
After the initial onboarding, the device is visible in Defender for Endpoint with the status “onboarded”.
The device status can be used for validating the correct health state. The following device states are available in Defender for Endpoint.

| Status | Action | Description |
|---|---|---|
| Inactive | Device isn’t in use for 7 days | Device is going to inactive after 7 days no activity |
| Inactive | Device was reinstalled or renamed | A new device entity is generated in Microsoft 365 Defender for reinstalled or renamed devices. Previous device entity remains in Defender for Endpoint. |
| Inactive | Device was offboarded | After offboarding the health state should change to inactive. The device will still appear in the device overview. |
| Inactive | Device isn’t sending signals | If the device isn’t sending any signals to any Microsoft Defender for Endpoint channels for more than seven days for any reason, a device can be considered inactive |
| Misconfigured | Impaired communications | Limit communication between device and Defender for Endpoint. |
| Misconfigured devices | No sensor data | Device with status ‘No sensor data’ has communication with the service but can only report partial sensor data. |
Conclusion
Part3 of the Microsoft Defender for Endpoint series is completed – focussed on the initial Defender for Endpoint onboard. Stay tuned for the next parts; where more in-depth knowledge and experience will be shared around Defender for Endpoint focussing on all the components and additional settings.
Next, in the upcoming blogs – sub-parts focussing on the initial deployment for:
- Onboarded using Defender for Cloud/ Defender for Server integration
- Microsoft Endpoint Configuration Manager
- Microsoft Endpoint Manager/ Intune
- Group Policy
- Local script (PowerShell)
Searching for specific Defender for Endpoint information? Use the contact submission form and share the post ideas or contact using Linkedin or Twitter. I will take all suggestions into the Defender for Endpoint series and help the community as far as possible.
View previous part – Configure Defender for Endpoint – Part2
View next part – Onboard using Microsoft Intune – Part3A
Sources
Microsoft: Defender for Endpoint documentation
Microsoft: Defender for Endpoint deployment guide
Microsoft: Configure device proxy and Internet connectivity settings