Since the last years, there is a large increase in cybercriminals attempting to run attacks by exploiting the login credentials. With the current work-from-home scenario, more attacks are visible against the RDP protocol. At the moment one of the most common attacks against VMs in Azure is based on the RDP brute-force attack. In this blog what happens within 12 hours with an open RDP connection and the ways of monitoring RDP events based on Azure Sentinel.
RDP attack most frequent attack
The most frequent attack that we often see is an attack on the RDP/SSH management port. Also known as the brute force attack. With Azure Security Center and Azure Sentinel it is possible to detect the RDP brute-force attack. An RDP or SSH brute force attack can compromise users with weak passwords without Multi-Factor Authentication enabled.
RDP attacks actively used?
Yes, Shodan is an internet port scanner that shows almost more than 3.5M RDP ports open. The Netherlands is ranked at #4 with almost 106.000 open RDP protocols. Attackers use automated systems to scan frequently the internet for open ports which are available with only username and password protection.

With these stats more important to monitor the RDP brute-forcing attack. Some stats from Kaspersky research lab; since the beginning of March 2020 (COVID19) huge increase in RDP attacks.

Monitoring RDP attacks
This blog post will show you how to use Azure Sentinel / Azure Security Center to detect a brute force attack based on RDP.
- Monitor with Azure Sentinel
- Monitor with Azure Security Center
- Monitor with Event collector and Microsoft Monitoring Agent
- Hunting sign-in with Azure Sentinel
- List used account names
Let’s show what happens in a short timeframe with a demo Azure Server 2016 Machine with open RDP ports without Azure Defender JIT enabled.

Prerequisites
First the prerequisites for the solutions:
VM Cloud only Azure Defender:
- Azure Sentinel enabled
- Azure Security Center enabled
VM Hybrid/on-prem/cloud without Azure Defender:
- Azure Sentinel enabled
- Azure Sentinel Events data connector enabled
- Microsoft Monitoring Agent configured
Connect Security Events – without Azure Security Center
For standalone/ servers without Azure Security Center enabled it is possible to connect the Security Events connector from Azure Sentinel for the specific devices.
To collect Windows security events, take the following Azure Sentinel steps:
- Open Azure Sentinel
- In the menu select Data connectors
- Select the Security Events connector and open the connector page

Verify first that you have read and write permissions for the workspace. Next, it is required to install the Microsoft Monitoring Agent on the machine for streaming security events into the Azure Sentinel workspace. The Microsoft Monitoring Agent is supported for non-azure Windows machines and can be installed on all the supported OS types.
From the data connector configuration page, you have the option to install the agent on Azure Windows Virtual Machines or non-Azure Windows Machines. I will be using Azure Windows virtual machines for the current blog. Click on: Download & install agent for Azure Windows Virtual Machines.

The difference:
- Azure Windows Virtual Machines= Installation from the Azure portal
- Non-Azure Windows Machine = Manual configuration with MMA setup

For each virtual machine available in the list, click on the name and connect

The connect might take 10 minutes to complete the onboarding. Give it some time and wait for the connected state in the view. On the server you see the Microsoft Monitoring Agent configured with the Azure Sentinel workspace configuration.

Now, if we go back to the data connector configuration page there is the option to configure which events to stream to Azure Sentinel/ Log Analytics. For now, 4 events groups are available:
- All events – All Windows security and AppLocker events
- Common – A standard set of events for auditing purposes
- Minimal – A small set of events that might indicate potential threats. By enabling this option, you won’t be able to have a full audit trail
- None – No security or AppLocker events
For getting the RDP brute-force events select minimal or common.

Now the event streaming is enabled from the Windows Server test machine to Azure Sentinel / Log Analytics. By checking the Virtual Machines overview from the Security Events page the device is connected:
Collect events cloud machines – Azure Security Center
First the Azure Security Center solution. Azure Security Center provides unified management by identifying misconfiguration and provide visibility into new threats. Azure Security Center automatically collects and analyzes the log data from your Azure resources. RDP attack data is included in the collected Security Center data. EventID 4625
Connect Azure Security Center with Sentinel
- Open Azure Sentinel
- In the menu select Data connectors
- Select the Security Events connector and open the connector page

Now connect the Azure Defender subscription. Integration can be enabled only with subscriptions that are running Azure Defender plans on Azure Security Center, and can be connected only by users with contributor permissions on the subscription.

Once an RDP attack is active on your Azure VM, you will receive an alert from Security Center. Part of Security Center is the algorithm machine learning mechanism to detect Brute force detections.
Make sure the incident creation is enabled for Azure Security Center alerts. For activating the rule. Enable the analytics rule: Create incidents based on Azure Defender alerts

Checking the data
Now it’s time to show the result with some hours of events. If you don’t know RDP brute force attacking is heavily used, you know it after this blog post.
Note: Machines connected: Windows Server 2016 without any domain join or connection without Azure Security Center/ JIT
Below the stats for 12 hours of data.
By creation, these stats below the 89.1k events is changed to 125k events within 1 hour.
- 89,1K RDP events registered from Security Event log connector
- 250+ Brute forcing alerts triggered
- Failed Sign-ins (EventID 4625)
- 85.000 with username administrator
- 203 with username Administrator
- 203 with username Admin
- 201 with username User
- 182 with username domain\adminisrator
- 116 with username winsrv
- 102 with username DefaultAccount
- And many more
- IP’s
- 42 different IP’s
RDP Brute force Attack in 3.2.1 go…

Showing the first 30.000 results: Now you know, there is a lot of data available for eventID 4625.

KQL Hunting
The data is in place. Now you have the option to start hunting based on the Security Event data. Some interesting examples of KQL hunting:
Summarize Usernames used:
View used Usernames and summarize the result with the count value. Replace Account for IPAddress to summarize the IP results.
SecurityEvent
| where EventID == “4625”
| where AccountType == “User”
| summarize count=count() by Account

With the Render Piechart convert the layout to piechart view: Tip: Don’t use the default administrator name.

Search for eventID 4625:
View all the events related to eventID 4625 and extend the AccountEntity with Account and the IPAddress.
SecurityEvent
| where EventID == 4625
| project TimeGenerated, EventID, WorkstationName, LogonTypeName, Account, Computer, IpAddress
| extend AccountEntity = Account
| extend IPEntity = IpAddress

The possibilities are endless based on the data and KQL.
Azure Sentinel ML Behavior Analytics
Once all the data is connected to Azure Sentinel it is possible to create monitoring alerts. There are different ways to monitor RDP attacks with Azure Sentinel. One of the examples is the new ML behavior Analytics.
ML Behavior Analytics – RDP Login Detections
ML Behavior Analytics is the machine learning model from Microsoft/ Azure Sentinel. Currently the RDP Login detectionML rule is in preview.
Scenarios currently included:
- Unusual IP – This IP address has not or has rarely been seen in last 30 days.
- Unusual Geo – The IP address, city, country and ASN have not (or rarely) been seen in last 30 days.
- New user – A new user logs in from an IP address and geolocation, both or either of which are not expected to be seen in the last 30 days.
Give the rule 7 days to build a profile based on the activity for your environment.
For configuring the ML Behavior Analytics RDP Login detections rule.
- Open Azure Sentinel
- Go to Analytics
- Go to Rule templates
- Search for “RDP”
- Open the rule template (Preview) Anomalous RDP Login Detections and create the new template.

Custom Analytics rule
Without the ML Behavior Analytics rule you have the option to create a custom Analytics rule. For creating an analytics rule for brute force attack:
- Open Azure Sentinel
- Go to Analytics
- Create Scheduled query rule
Give the analytics a name and description. For RDP brute force attack select the MITRE ATT&CK tactics: Initial Access and Credential Access. Configure also the severity.

Under the rule logic configure the rule query (KQL). For example use:
SecurityEvent
| where EventID == 4625
| project TimeGenerated, EventID, WorkstationName, LogonTypeName, Account, Computer, IpAddress
| extend AccountEntity = Account
| extend IPEntity = IpAddress
Now mapping the attributes in Azure Sentinel under the Alert enrichment (preview) section:

For this blog we use the query scheduling times. Change any times if needed.
- Run query every: 5 Minutes
- Lookup data from the last 30 Minutes
On the Incident setting page, enable Alert grouping to group alerts into single incidents if all the entities give a match. For the example below all the alerts are created within the selected time frame of 1 day.

Validate in the review and create section the settings and create the rule.
Analytics rule – Investigation

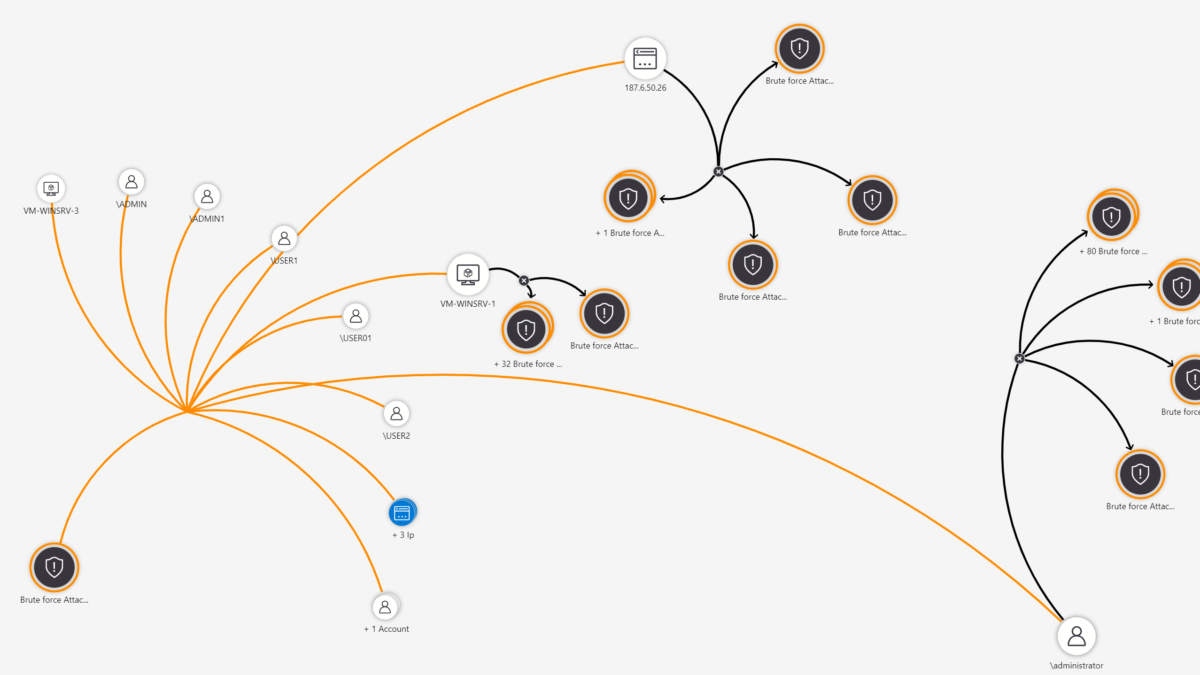
Once the incident is created, you can view more details by opening the investigation view. For opening the investigation view. Go to Incidents and open one of the incidents created. ( view full details)
Now the following information is visible:
Part of the incident :
- 2.3K events
- 1 alert
- 13 Entities
For opening the investigation view. Click: Investigate

Example of the investigation view with all the information.

Prevent the RDP brute force attacks
With Azure Sentinel you can detect the types of attacks. It is better to prevent an attack from happening. One of the best ways to protect is to enable Azure Security Center Just in Time Access.
With Azure Security Center JIT the feature will disable the remote access port(s). From the admin view, the user can enable with MFA verification the RDP port. With the approval, the port is open only from the Source IP address or IP range of the Admin for a defined amount of time. More information in one of the next blogs. Note: Azure Defender must be enabled for getting the JIT feature.
More about JIT and additional protection features follow in one of the next blog posts.
Tip: Don’t use the default administrator name.
Conclusion
In this blog, I showed what will happen in a short time period with open RDP ports. Make sure RDP is protected (VPN, Network, JIT, Bastion e.d) and monitored in the environment. As you have seen in this blog; RDP brute force attacks heavily used and there are multiple ways to monitor it with Azure Sentinel.
Sources
EventID: 4625 An account failed to log on


