Microsoft Defender for Endpoint deployment is possible based on multiple deployment mechanisms. Microsoft Defender for Cloud (previous Azure Defender) is available in Azure, with Microsoft Defender for Cloud it is possible to manage devices in Azure. By using Azure Arc, it is possible to onboard on-premise servers or servers from a different cloud factor to monitor the security posture and onboard devices directly to Defender for Endpoint.
Updated blog: Azure Arc post part of the MDE series is more frequent. Microsoft Defender for Endpoint series – Onboard using Azure Arc – Part3C
Introduction
In this blog, I will explain the usage of Azure Arc, Defender for Cloud, and Defender for Endpoint with the main goal – onboard non-Azure devices with Defender for Cloud directly into Defender for Endpoint.
- Onboard non-Azure machines into Azure Arc with Azure Arc-enabled servers
- Enable Defender for Cloud
- Enable Defender for Cloud – Auto Provisioning
- Integrate Defender for Cloud and Defender for Endpoint
Notice: Blog will not go in-depth in all the options of Azure Arc. The focus of this blog is the onboarding process between Azure Arc – Defender for Cloud and Defender for Endpoint. More in-depth blogs are coming for all the components. Blog request? Don’t hesitate to email me, or ping me on other socials.
What is Azure Arc?
Firstly a small introduction to Azure Arc in a nutshell. Azure Arc is a hybrid cloud solution that extends Azure Management services and Azure services to on-premises, edge, and multi-cloud environments. This means that you can run Azure services from anywhere within the environment restrictions. For example: Enable Defender for Cloud for on-premises machines and deploy Defender for Endpoint automatically.
For more Azure Arc information see: Azure Arc overview
Prerequisites Azure Arc
For connecting machines into Azure Arc there are some requirements needed. Note: Azure Arc-enabled servers does not support installing the agent on machines running in Azure, Azure Stack Hub or Azure Stack Edge. All of them are already configured as Azure VM. The following Windows operating systems are supported for Azure Arc Connected machines.
Note: Linux is possible too – a separate blog for Linux is coming soon. This blog focuses only on Windows.
OS
- Windows Server 2008 R2 SP1
- Windows Server 2012R2
- Windows Server 2016
- Windows Server 2019
- Windows Server 2022
Azure subscriptions
- Limit of 5.000 machines for each resource group
- Resource providers enabled:
- Microsoft.HybridCompute
- Microsoft.GuestConfiguration
- Microsoft.HybridConnectivity
For all other prerequisites (Network, TLS, permissions) visit docs.microsoft.com
Start with Azure Arc – prepare
For onboarding local servers on your corporate network, or other cloud providers we use Azure Arc-enabled servers. For connecting machines within Azure Arc there is a separate agent needed. Multiple ways are available for deploying the agent.
- Add a single server (script)
- Add multiple servers (service principal)
- Add servers from Update Management
- Add servers with Azure migrate
For this blog, the method used is Single server (script). The single server script needs to authenticate with Azure AD to validate directly with the Azure subscription. For more scale deployment the service principal or other methods can be used and are preferred. View all onboarding details: Connect hybrid machines to Azure from the Azure portal – Azure Arc | Microsoft Docs.
For onboarding the first server – open Azure and launch the Azure Arc services – and follow the below steps (when Azure Arc is not configured yet, launch the setup)
Azure Arc needs access to port 443 for some required URLs, local administration permissions for the installation, and connectivity.

- Go to Azure Arc and navigate to Servers, then push +Add

- During the add servers selection wizard, push the method Generate script. Notice: For deploying multiple servers use one of the more advanced onboarding options.

- Read the prerequisites and adjust changes when needed

- Now configure the resource details. Select the correct subscription and Resource group. Notice: Each resource group can contain 5000 Arc servers. For the server details select the region and operating system platform. Network connectivity is the type of connection that is available for connecting servers to Azure. For servers that have direct access to the internet, select Public endpoint.

- The tags section makes it possible to configure physical location tags. For this blog, we use the datacenter tag AMS-DATA and City Amsterdam. There are more advanced options for deploying Azure (Arc) tags with code.

- Now, after the configuration we can run the onboarding script. Download or copy the PowerShell script and run the script. During the script the Azure Connected Machine Agent with the name azcmagent.exe will be installed. The Resource Group, Tenant ID, Location, Subscription ID, and optional tags will be configured during the installation.

Start with Azure Arc – Install agent
For onboarding devices into Azure Arc run the script prepared in the previous step. When using the single server onboarding – some verification steps are required. If you receive an error when configuring the Azure Arc-enabled servers agent – view the error codes.

For the verification; go to https://microsoft.com/devicelogin – enter the code part of the PowerShell script output.

Once the machine is successfully onboarded, you will be able to see it listed on the Azure Arc blade. For validating the onboarding – go to the Azure Portal, open the Azure Arc services and navigate to the server blade.

The device page shows more advanced details and brings more Azure management features for the on-premises server. For example Defender for Cloud, Azure Monitoring, Azure Policy, and many more.

Enable Defender for Cloud
The Azure Arc device is now detected as an Azure resource. Now we can enable Defender for Cloud in the subscription where the Azure Arc resource group is located. For enabling Defender for Cloud:
- Navigate to Defender for Cloud
- Go to environment settings and press the subscription which is used during the Azure Arc configuration

- For Defender for Cloud make sure the Defender for Cloud plan is enabled. The Defender for Cloud plan brings multiple security features and included Defender for Endpoint (EDR) threat protection onboarding. For Windows servers enable the resource type; Servers ( cost $15/server/month, and includes MDE EDR license)

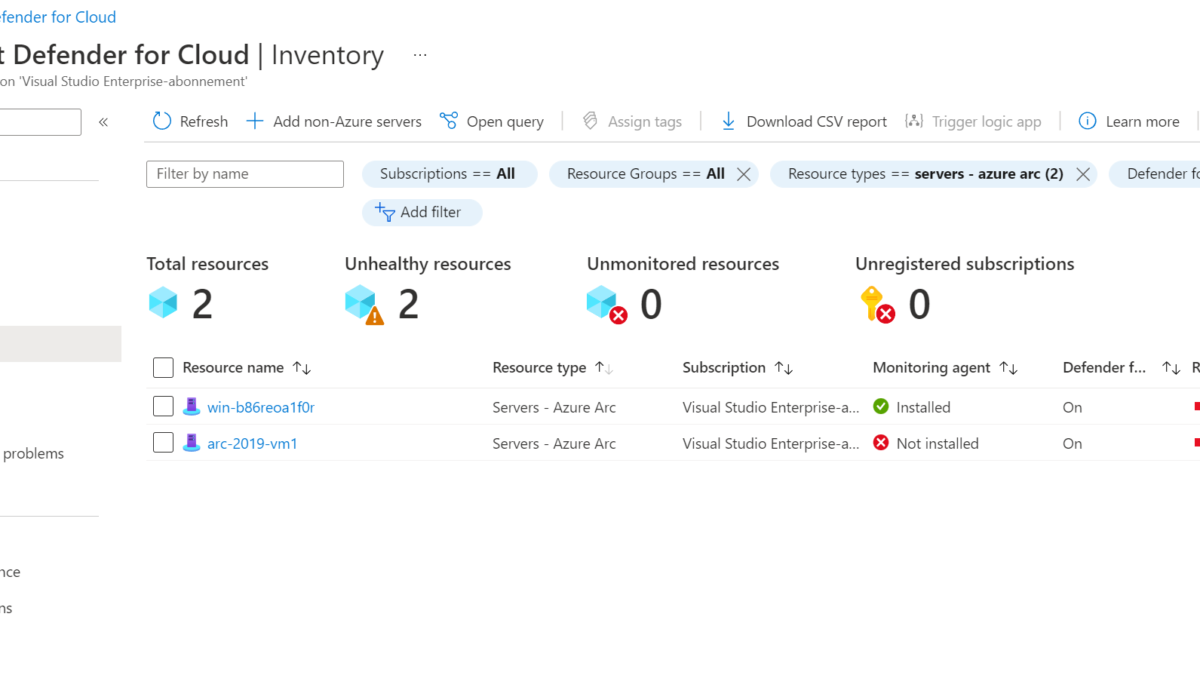
After some time the device is visible in the Defender for Cloud inventory. The below image shows one Azure Virtual machine (2) and one Azure Arc machine(1). All resources are enabled for the monitoring agent and Defender for Cloud. The difference is the resource type; Azure VM is part of the resource type Virtual machines and Azure Arc devices are part of the type server – Azure Arc.

Auto Provisioning – Azure Arc devices
Defender for Cloud collects security data and events – installation of the required Log Analytics workspace is required. Manual installation of the Log Analytics agent is possible. However, auto provisioning part of Defender for Cloud makes it easier to install all required agents and extensions.
When automatic provisioning is on for the Log Analytics agent, Defender for Cloud deploys the agent on all supported systems automatically. Defender for Endpoint contains two Log Analytics extensions, for Azure Arc we need to use the Log Analytics agent for Azure Arc Machines. Important: Feature currently in preview.
- Navigate to Defender for Cloud
- Go to environment settings and press the subscription which is used during the Azure Arc configuration
- Go to Auto provisioning
- For Azure Arc Machines we need to use the Log Analytics agent for Azure Arc Machines (preview) extension. Enable the extension in the Auto provisioning view.

- Currently during the preview there is no option for selecting the default workspaces created by Defender for Cloud. Microsoft says; For this preview, you can’t select the default workspaces that was created by Defender for Cloud. For configuring another Log Analytics workspace. Enable the extension and click edit configuration, now select the Log Analytics workspace.

- In the Auto provisioning view – click “Show in inventoy” to view all resources missing the extension.

More information: Auto provisioning | Microsoft Docs
Enable Microsoft Defender for Endpoint
For the integration with Defender for Endpoint open the integrations page, and allow Microsoft Defender for Endpoint to access my data. Defender for Cloud Apps can be enabled from the same integration view.

Microsoft Defender integration brings the following features directly to the Azure arc devices:
- Risk-based vulnerability management and assessment (TVM)
- Attack surface reduction (ASR)
- Behavioral-based and cloud-powered protection
- Endpoint detection and response (EDR)
- Automatic investigation and remediation (AIR)
Onboarding
Part of the feature is an automated Defender for Endpoint onboarding. Defender for Cloud automatically enables the Defender for Endpoint sensor on all supported machines connected to Defender for Cloud. Only the requirements for Defender for Endpoint are needed and optional AV configuration.
Server 2016 machine part of my Hyper-V domain is visible in Azure Arc and automatically onboarded in Defender for Endpoint using the Defender for Cloud plan/ integration.
Below images shows the following integrations Azure Arc – Defender for Endpoint and Defender for Cloud -> Defender for Endpoint


Compliance check
Part of Defender for Cloud is the recommendations view/ resource health view. Recommendations needed for Defender for Endpoint are directly visible in the Defender for Cloud view:
Research health page shows the following:
- Azure Arc machine type (1)
- Monitoring agent installed or not installed (2)
- Active recommendations (3)
- Defender for Servers plan enabled (4)
- Selected context – Recommendations for Defender for Endpoint / Endpoint Protection.

Alert integration
After the integration, all systems alerts detected by Defender for Endpoint are visible in Defender for Cloud. Example below with some launched simulations. WIN-B86REOA1F0R is located on-prem and onboarded with Azure Arc – Defender for Cloud into Defender for Endpoint.

When opening the Antimalware Action Taken alert more in-depth information is visible:

Conclusion
Azure Arc makes it possible to onboard non-azure machines and uses the modern functions which are available in Azure and Defender for Cloud. With the Defender for Cloud – MDE integration we onboarded devices direct into Defender for Endpoint.
More blogs coming soon – with more deep-dive for specific components part of Azure Arc, Defender for Cloud, or Defender for Cloud.
Microsoft: What is Microsoft Defender for Cloud?
Microsoft: Onboard server to Azure Arc


Thanks Jeff, is MMA still the requirement for auto onboarding{integration} of MDE to work?
Can I use Azure ARC for non azure VM’s and use “Azure Monitor Agent (AMA)” instead of MMA. Does the Auto integration work in this scenario?
Correct – MMA is still required for the current onboarding for the down-level systems. (2012R2,2016)
The new unified MDE onboarding which is part of MDE will fix this issue. Microsoft is working on it. Currently preview for non-azure machines.
Microsoft says;
For Windows Server 2012 R2 and 2016 running the modern unified solution preview, integration with Microsoft Defender for Cloud / Microsoft Defender for servers for alerting and automated deployment is not yet available. Whilst you can manually install the new solution on these machines, no alerts will be displayed in Microsoft Defender for Cloud.
https://docs.microsoft.com/en-us/microsoft-365/security/defender-endpoint/configure-server-endpoints?view=o365-worldwide#new-windows-server-2012-r2-and-2016-functionality-in-the-modern-unified-solution-preview
https://techcommunity.microsoft.com/t5/microsoft-defender-for-endpoint/defending-windows-server-2012-r2-and-2016/ba-p/2783292
Let me know when more information is needed. Happy to help
WHen I try to install the Microsoft.Azure.AzureDefenderForServers.MDE.Windows plugin on 2008 R2 SP1 it says 2008 is not supported but it is 2008 R2 SP1
I do have similar issue. did you solve it? Based on Microsoft support case it seems to be supported but as we do not have ESU (extended security updates), I was informed that we are not legible for the support from MS to resolve this… .
Hi Jeffrey, after onboarding the on-premise servers how we can manage AV policies
Hi Justin,
Multiple methods are available. GPO/ Configuration Manager/ PowerShell/ Intune or the new MDE management.
See: https://jeffreyappel.nl/microsoft-defender-for-endpoint-series-configure-av-next-generation-protection-part4/
Hi Jeffrey,
First, thank you so much for all the efforts and contributions to the community!
I used Azure Arc to enroll windows 2016 & 2019 servers and successfully installed MDE extension via Arc. I could see the servers in MDE portal, but the MDE Enrollment status is N/A and Managed by is Unknown. Due to this, I am not seeing the servers in Intune and so unable to apply policies as well. Could you please advise? I also check the pre-requisites on MDE portal and enabled all options as mentioned.
Hi Ambarish,
Good to hear Azure Arc is configured.
Do you know of MDE management is fully configured?
See this blog for more detailed explanation: https://jeffreyappel.nl/managing-microsoft-defender-for-endpoint-with-the-new-security-management-feature-in-mem/
Hi Jeffrey, actually I have onboarded Window Server 2012 & 2016 to the Azure Arc. As I have enabled the endpoint protection setting in the Defender for Cloud, does it mean the MDE.window and AMA will be auto provisioned to the target machine?
Yes, when the Defender for Server plan is enabled including both integrations it will work.
Part of the installation is the installation of the MDE.Windows extension, when the extension is succeeded it will onboard the machine automatically to defender for Endpoint (MDE).