Microsoft Defender for Endpoint series – Attack Surface reduction and additional protection – Part4B
It is time for part 4B of the ultimate Microsoft Defender for Endpoint (MDE) series. Part 4A explains the AV policy baseline. Now it is time for some more detailed information for the Attack Surface reduction and additional protection layers of Defender for Endpoint and Defender AV.
NOTE: The blog series focuses on features in Microsoft Defender for Endpoint P2 all Microsoft Defender for Endpoint P1 features are available in P2.
Specific question or content idea part of Defender for Endpoint? Use the contact submission form and share the post ideas.
Introduction
Microsoft Defender Antivirus is Microsoft Defender for Endpoint’s ‘next-generation protection component‘ that combines machine learning, big data analysis, threat research, and Microsoft’s cloud infrastructure to protect devices more in-depth with additional layers based on behavior, heuristics, and real-time protection. Additional to the basic settings of Defender AV, there are more protection features available. In a simple overview the following configurations are available;
Attack surface reduction
- Attack Surface Reduction (ASR) Rules
- Controlled folder access
- Device control
- Exploit protection
- Network protection
- Web protection
- Ransomware protection
- Application control
- HW-based isolation
Additional Defender protections
- Windows Defender Credential Guard
- Microsoft Defender SmartScreen
- Windows Defender Firewall
Defender for Endpoint contains multiple capabilities to reduce the attack surfaces and increase the protection capabilities. Attack Surface Reduction (ASR) is the name and contains multiple features.
Attack Surface Reduction (ASR) rules
Attack surface reduction (ASR) is the name Microsoft gave a collection of controls that restrict common malware and exploit techniques. ASR rules are part of the ASR controls in Defender. See ASR as an umbrella term for all the built-in and cloud-based security features.
Attack surface reduction rules are important and help close many of the common attack points used by malware and ransomware, with the use of ASR the attack will be blocked from the first initial activity. ASR blocks common activities with are commonly associated with malicious activity. Examples;
- Blocking Office applications from creating child processes
- Block Office applications from injecting code into other processes
- Block JavaScript or VBScript from launching downloaded executable content
- Block credential stealing from the Windows local security authority subsystem
- And many more
What are the requirements for enabling ASR rules
ASR rules can be enabled for devices where Defender antivirus is running in active mode. ASR is not working when Defender is running in passive mode. Some of the rules require cloud-delivered protection which is always recommended to enable. Other requirements:
- Windows 10 Pro, Enterprise, Education version 1709, and later
- Windows Server 2012R2/ 2016 supported using MDE unified agent
More requirements: Attack surface reduction rules overview | Microsoft
ASR states
With the use of the management methods ASR can be configured using the following states:
- Not configured
- Block
- Audit
| IMPORTANT: ASR in audit mode generates only events for insights. There is no blocking action part of the audit state. Recommendation: Start the rules in audit mode and review events via Defender reporting or advanced hunting. |
Recommended blog series: (source: Microsoft)
- Demystifying attack surface reduction rules – Part 1
- Demystifying attack surface reduction rules – Part 2
- Demystifying attack surface reduction rules – Part 3
- Demystifying attack surface reduction rules – Part 4
Default protection
The following rules are part of the standard protection.
- Block credential stealing from the Windows local security authority subsystem (lsass.exe)
- Block abuse of exploited vulnerable signed drivers
- Block persistence through Windows Management Instrumentation (WMI) event subscription
| Recommendation: It is the recommendation to always enable the default protection set of ASR. Block credential stealing gives lots of noise in the MDE portal; based on my experience 99% is false positive and not needed to whitelist. |
Deployment plan
Recommended is to enable all ASR rules in audit mode to view possible impact and enable the blocking mode in ‘rings’. This makes the following plan:
- Enable ASR rules in audit mode for scoped group
- Review ASR audit events in the Microsoft 365 Defender portal via reporting and advanced hunting
- Enable ASR rules in audit mode for all devices
- Review ASR audit events in the Microsoft 365 Defender portal via reporting and advanced hunting
- Create exclusions when needed (Limit the use of exclusions)
- Set rules to “block” for the first ring
- Review the ASR reporting page in the Microsoft 365 Defender portal.
- Create additional exclusions when needed
- Expand the ring scope and view the reporting
| Important: exclusions could potentially allow unsafe files to run. Use exclusions only when needed. It is better to understand why the user performs the actions and help with alternatives to reduce the attack factor and adopt more common/ recent techniques. |
Reporting
Reporting is available via built-in MDE reporting or advanced hunting. For the built-in report. Go to security.microsoft.com -> Reports -> Attack surface reduction rules

Reports show the count of audit detection and block detections. By default the filter: standard protection is enabled. Change the rule to All for viewing the complete scope.

More detailed explanation for this report: Attack surface reduction (ASR) rules report
Advanced hunting
Provides a summary of Attack Surface Reduction rules, which rules are being hit, and by which processes:
DeviceEvents
| where ActionType startswith "Asr"
| summarize ASRCount=count()by ActionType, InitiatingProcessCommandLine
| sort by ActionType asc, ASRCount desc Summary of each ASR rule:
DeviceEvents
| where ActionType startswith "Asr"
| summarize NumberOfEvents=count() by ActionType
| sort by NumberOfEvents descConfigure ASR with Intune
For configuring ASR, always use the latest profile in Endpoint Security. Device restrictions or security baselines do not contain the latest ASR rules.
Go to Endpoint Security -> Attack surface reduction and create a new Attack Surface Reduction Rules profile.

Configure the ASR rules with the correct state (Off, Block, Audit, Warn)

Important: The rule Block Webshell creation for servers is only applicable for exchange servers. Don’t enable audit or block on other endpoints, since this will result in errors for other ASR rules.
Configure ASR with GPO
Before starting with GPOs, make sure the latest ADMX package is updated. ASR is part of the Defender Antivirus profile.
In the Group Policy Management Editor, go to Computer configuration and select Administrative templates and expand Windows components > Microsoft Defender Antivirus > Microsoft Defender Exploit Guard > Attack surface reduction.
ASR in GPO is only possible based on the Rule ID/ GUID. Configure the Value name and value.
- 0: Disable (Disable the ASR rule)
- 1: Block (Enable the ASR rule)
- 2: Audit (Evaluate how the ASR rule would impact your organization if enabled)
- 6: Warn (Enable the ASR rule but allow the end-user to bypass the block)
| Rule Name | GUID |
|---|---|
| Block abuse of exploited vulnerable signed drivers | 56a863a9-875e-4185-98a7-b882c64b5ce5 |
| Block Adobe Reader from creating child processes | 7674ba52-37eb-4a4f-a9a1-f0f9a1619a2c |
| Block all Office applications from creating child processes | d4f940ab-401b-4efc-aadc-ad5f3c50688a |
| Block credential stealing from the Windows local security authority subsystem (lsass.exe) | 9e6c4e1f-7d60-472f-ba1a-a39ef669e4b2 |
| Block executable content from email client and webmail | be9ba2d9-53ea-4cdc-84e5-9b1eeee46550 |
| Block executable files from running unless they meet a prevalence, age, or trusted list criterion | 01443614-cd74-433a-b99e-2ecdc07bfc25 |
| Block execution of potentially obfuscated scripts | 5beb7efe-fd9a-4556-801d-275e5ffc04cc |
| Block JavaScript or VBScript from launching downloaded executable content | d3e037e1-3eb8-44c8-a917-57927947596d |
| Block Office applications from creating executable content | 3b576869-a4ec-4529-8536-b80a7769e899 |
| Block Office applications from injecting code into other processes | 75668c1f-73b5-4cf0-bb93-3ecf5cb7cc84 |
| Block Office communication application from creating child processes | 26190899-1602-49e8-8b27-eb1d0a1ce869 |
| Block persistence through WMI event subscription * File and folder exclusions not supported. | e6db77e5-3df2-4cf1-b95a-636979351e5b |
| Block process creations originating from PSExec and WMI commands | d1e49aac-8f56-4280-b9ba-993a6d77406c |
| Block untrusted and unsigned processes that run from USB | b2b3f03d-6a65-4f7b-a9c7-1c7ef74a9ba4 |
| Block Win32 API calls from Office macros | 92e97fa1-2edf-4476-bdd6-9dd0b4dddc7b |
| Use advanced protection against ransomware | c1db55ab-c21a-4637-bb3f-a12568109d35 |
Configure ASR with PowerShell
The PowerShell cmdlet Set-MpPreference can be used for enabling ASR in audit, warn or block mode. Use the above GUID and the action in PowerShell.
Enabled mode
Set-MpPreference -AttackSurfaceReductionRules_Ids <rule ID> -AttackSurfaceReductionRules_Actions Enabled
Audit mode
Add-MpPreference -AttackSurfaceReductionRules_Ids <rule ID> -AttackSurfaceReductionRules_Actions AuditMode
Warn mode
Add-MpPreference -AttackSurfaceReductionRules_Ids <rule ID> -AttackSurfaceReductionRules_Actions Warn
Example:
Set-MpPreference -AttackSurfaceReductionRules_Ids 7674ba52-37eb-4a4f-a9a1-f0f9a1619a2c -AttackSurfaceReductionRules_Actions Enabled
Do we need Windows Firewall in combination with MDE?
Absolutely; enable always the Windows Firewall when possible – enablement of the Windows Firewall is heavily underrated and improves security. Defender for Endpoint uses the Windows Firewall logs for additional network reporting and details in the DeviceNetworkEvents.
Microsoft Defender for Endpoint supports different layers of network reporting and insights based on network traffic including native network detection and events in the DeviceNetworkEvents table.
Important to make sure Windows Firewall is enabled for all zones including the following audit events:
| Recommendation: Enable Windows Firewall for all zones including the filtering platform packet drop and platform connection audit events. Ideally, apply the TVM recommendations for the Firewall. Don’t forget to disable the local admin merge (be careful with local rules) |
| Important: Additional event collection can lead to more data in the SIEM. Without auditing enabled the report is not working, all other functions depend on the needs and cost/benefit balancing. |
Configuration using Intune
Use Endpoint Security -> Firewall -> Profile: Firewall rules and configure the recommended Windows Firewall settings.
Enable the firewall for all zones and auditing settings. Don’t forget to check the Microsoft or other security baselines for configuring Windows Firewall. Windows Firewall is still underrated and must be part of each baseline for workstations and servers. Each state is better in comparison with the completely disabled state.
Important: Only enable the failure events for both auditing items.

Configuration using PowerShell
Note: basic configuration – needed to be optimized for each environment. The below scripts enable the Firewall Profile for the Domain, Public, and Private profiles and configured the additional filtering.
Set-NetFirewallProfile -Profile Domain,Public,Private -Enabled True
auditpol /set /subcategory:"Filtering Platform Packet Drop" /failure:enable
auditpol /set /subcategory:"Filtering Platform Connection" /failure:enableWhat do we have after enabling and integrating the correct events?
After enabling the Firewall profiles and additional events, the following data is monitored and visible in the Defender for Endpoint Firewall reporting: Security.Microsoft.com -> Reports – Firewall
- Remote IP
- Remote Port
- Local Port
- Local IP
- Computer Name
- Process across inbound and outbound connections

Web protection
Web protection Microsoft Defender for Endpoint is a capability made up of web threat protection, web content filtering, and custom indicators.
All features are based on network protection and SmartScreen. Custom indicators can be used in Defender for Endpoint to block websites or specific web-related IOCs. Where web content filtering includes auditing/ blocking for specific categories.
Go to security.microsoft.com, choose Settings > Endpoints > Web content filtering > + Add policy. Specify a name and select the categories to block.
Audit only is possible when creating a policy without any checkbox enabled in the blocked categories.

Phishing is mostly targeted at new domains. It can be useful for blocking the following categories in web content filtering. Newly registered domains are domains that are in in the past 30 days registered and not moved to another category. Parked domains are sites without content or are parked for later usage.

| Recommendation: Enable web protection always in audit mode. Ideally, start with the audit-only policy for getting insights. Enable always Network Protection for preparing MDE for blocking specific indicators and additional C2/ Network protection. |
Web Protection reporting is available in the reporting section:

As already mentioned in the previous 4A part; Network Protection is important to implement for all endpoints. For more NP-related information see the previous 4A part. One important note is the usage of SmartScreen. SmartScreen is built directly in Microsoft Edge and is responsible for Web Content Filtering, Custom Indicators, and Cloud App Rules. Only enabling Network Protection is not enough for getting network protection included in Microsoft Edge.
SmartScreen must be enabled and configuration is possible via GPO, PowerShell, and Intune.
Block result: SmartScreen ( MS Edge)
Block result: Network Protection (Chrome)

| Recommendation: Enable SmartScreen for Edge and including the SmartScreen potentially unwanted app feature (removes the yellow warning of Defender). Don’t forget to enable SmartScreen for other components (Windows Explorer) |
SmartScreen configuration using Intune
Intune contains some profiles and security baselines scoped for SmartScreen, for making sure all configurations are configured correctly my recommendation is to create a new custom profile in Intune based on the new settings catalog profile. Create profile -> Windows 10 and later -> Profile Type: Settings catalog

The following configuration is recommended for SmartScreen in Edge:
- Configure Microsoft Defender SmartScreen: This policy needs to be enabled so Microsoft Defender SmartScreen is turned on, and cannot be disabled via the end-user.
- Configure Microsoft Defender SmartScreen to block potentially unwanted apps: This policy needs to be enabled to block potentially unwanted apps based on low-reputation scores.
- Force Microsoft Defender SmartScreen checks on downloads from trusted sources: With the enablement of this policy Defender SmartScreen checks always the download reputation from trusted sources
- Prevent bypassing Microsoft Defender SmartScreen prompts for sites: Users cannot bypass the Microsoft Defender SmartScreen warnings for potentially malicious websites
- Prevent bypassing of Microsoft Defender SmartScreen warnings about downloads: Users cannot bypass the Microsoft Defender SmartScreen warnings for unverified downloads
- Enable Microsoft Defender SmartScreen DNS requests: With this policy Microsoft Defender SmartScreen is allowed to create DNS requests to get the IP address and use it for the IP-based protection layer.
Hunt for events
Use the following query for getting network protection events in Advanced Hunting:
DeviceEvents
| where ActionType == "ExploitGuardNetworkProtectionBlocked"
| extend ParsedFields=parse_json(AdditionalFields)
| project DeviceName, ActionType, Timestamp, RemoteUrl, InitiatingProcessFileName, ResponseCategory=tostring(ParsedFields.ResponseCategory)
| where ResponseCategory == "CustomPolicy"Use the following query for getting SmartScreen events in Advanced Hunting:
DeviceEvents
| where ActionType == "SmartScreenUrlWarning"
| extend ParsedFields=parse_json(AdditionalFields)
| project DeviceName, ActionType, Timestamp, RemoteUrl, InitiatingProcessFileName, Experience=tostring(ParsedFields.Experience)
| where Experience == "CustomPolicy"Network protection
Network protection is important for custom indicators from MDE. The new C2 blocking capability is created on top of the network protection layer. When network protection is enabled Defender can detect and block C2 communication from the process level.

Once network protection has been enabled. Test the C2 protection by using the following PowerShell test command. When completed – the URL is successfully blocked with the error: The request was aborted: Could not create SSL/TLS secure channel.
Invoke-WebRequest -URI https://commandcontrol.smartscreentestratings.comSee part 4A for the network protection enablement details.
| Recommendation: Enable network protection in block mode. Web threat protection and network protection is only working when network protection is enabled in block mode. Use custom indicators with the state ‘Allow’ for allowing blocked websites. |
SmartScreen phishing protection
Since Windows 11 version 22H2 there is enhanced phishing protection available in the SmartScreen component. Enhanced phishing protection helps with protecting work accounts against phishing and detects/ protects against unsafe usage on sites and apps. A nice one is the plaintext warning, when passwords are stored in plaintext (Notepad, Word, or any other Microsoft 365 app for example)
The new SmartScreen Phishing protection feature is part of the WebThreatDefense policy type in Defender. The best practice in Intune is to use the Settings Catalog for the configuration of the new settings.
For the configuration of the first profile go to Intune and create the first Settings catalog profile:
- First, sign in to the Intune Portal and go to Devices > Windows > Configuration Profiles. Select Create Profile.
- Select Platform as Windows 10 and later and Profile Type as Settings catalog and click Create
- Specify the name and optionally add a description
The Intune settings catalog makes it possible to configure all related settings needed for Microsoft Defender SmartScreen. On the Configuration settings window; select Add settings and type Enhanced Phishing Protection.

Select the following settings in the settings picker selection:
- Enhanced Phishing Protection
- Notify Malicious
- Notify Password Reuse
- Notify Unsafe App
- Service Enabled
Configure the following settings:
| Setting | Value | Explanation |
| Service Enabled | Enabled | Enhanced Phishing Protection in Microsoft Defender SmartScreen is in audit mode or off. All telemetry will be sent through Microsoft Defender. Enable = passive mode. |
| Notify Malicious | Enabled | Warns the user in the following situations: – Into a reported phishing site – into a Microsoft login URL with an invalid certificate – into an application connecting to either a reported phishing site or a Microsoft login URL with an invalid certificate When enabled notifications are enabled for the user. |
| Notify Password Reuse | Enabled | Enhanced Phishing Protection in Microsoft Defender SmartScreen warns your users if they reuse their work or school password. When enabled notifications are enabled for the user. |
| Notify Unsafe App | Enabled | Enhanced Phishing Protection in Microsoft Defender SmartScreen warns your users if they type their work or school passwords in Notepad, Winword, or M365 Office apps When enabled notifications are enabled for the user. |
View the blog for more information and SmartScreen phishing protection testing: Microsoft Defender SmartScreen – how to use SmartScreen and Phishing protection
Controlled folder access
Controlled folder access protects valuable data from malicious attacks and threats, such as ransomware. Controlled folder access protects devices by checking against a list of trusted apps.
Controlled folder access works by only allowing trusted apps to access protected folders. With this, only the specified apps are allowed to write in the specified folders. Microsoft managed a centralized list of where specific apps are located.
Controlled folder access is really useful against ransomware encryption. It prevents files from getting encrypted by non-common processes.
Controlled folder access can be enabled in audit mode for evaluating the impact and confirm no line-of-business apps are affected.
The Windows systems folders that are protected by default are:
- c:\Users\\Documents
- c:\Users\Public\Documents
- c:\Users\\Pictures
- c:\Users\Public\Pictures
- c:\Users\Public\Videos
- c:\Users\\Videos
- c:\Users\\Music
- c:\Users\Public\Music
- c:\Users\\Favorites
Hunt for events
Use the following query for getting Controlled Folder audit/blocked events in Advanced Hunting:
DeviceEvents
| where ActionType in ('ControlledFolderAccessViolationAudited','ControlledFolderAccessViolationBlocked')Configure Controlled folder access with Intune
For configuring Controlled folder access, always use the latest profile in Endpoint Security.
Go to Endpoint Security -> Attack surface reduction and create a new Attack Surface Reduction Rules profile.
Enable the setting Enable Controlled folder access and configure the state Audit Mode or Enabled
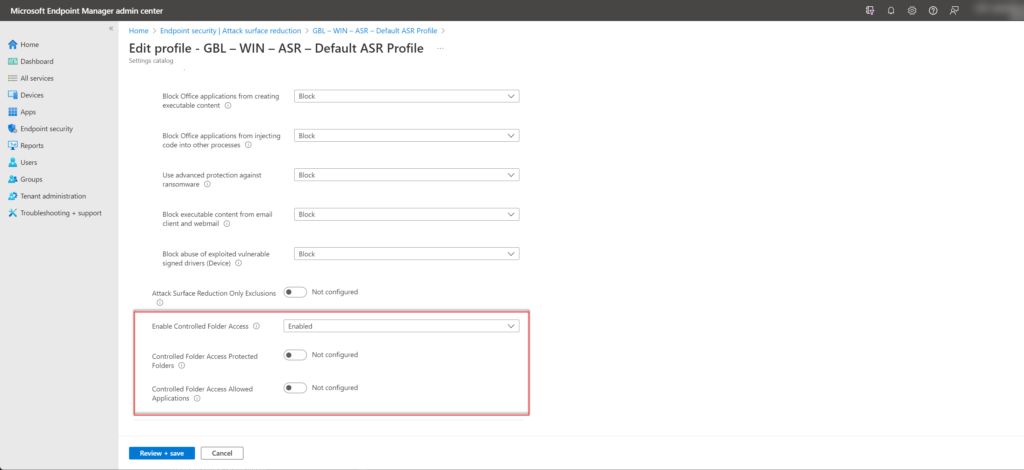
The setting Controlled Folder Access Protected Folders can be used for defining custom folders. Use the setting Controlled Folder Access Allowed Applications for adding applications to access the folders.
Configure Controlled folder access with PowerShell
The PowerShell cmdlet Set-MpPreference can be used for enabling Controlled folder access in Enabled or block mode.
Enabled mode (block)
Set-MpPreference -EnableControlledFolderAccess Enabled
Audit mode
Set-MpPreference -EnableControlledFolderAccess AuditModeFor other platforms (GPO/ Endpoint Configuration Manager): Enable controlled folder access | Microsoft Learn
| Recommendation: Start with testing Controlled folder access in audit mode and evaluate based on a ring approach the enablement of the Controlled folder access policy. In some of the environments, there is customization needed for specific apps. Advanced hunting helps with detecting events and incorrect behaviors to avoid issues. |
Credential Guard
Microsoft Defender Credential Guard uses virtualization-based security to isolate and protect secrets (e.g., NTLM password hashes and Kerberos ticket-granting tickets) to block pass-the-hash or pass-the-ticket (PtH) attacks.
Credential Guard uses virtualization-based security to isolate secrets/ credentials. So that only privileged systems can access them.
Microsoft Defender Credential Guard uses virtualization-based security to isolate and protect secrets (e.g., NTLM password hashes and Kerberos ticket-granting tickets) to block pass-the-hash or pass-the-ticket (PtH) attacks.
Recommended blog: Detect and block Credential Dumps with Defender for Endpoint & Attack Surface Reduction | Jeffreyappel.nl
Configure Credential Guard using Intune
Attack Surface Reduction can be enabled using Intune. Many options are currently available for enabling Defender Credential Guard. For enabling using the new Account Protection (preview) policy.
For configuring Credential Guard using the Endpoint Security profiles open the Endpoint Manager portal and navigate to Endpoint Security -> Account protection. Create a new Account protection profile.
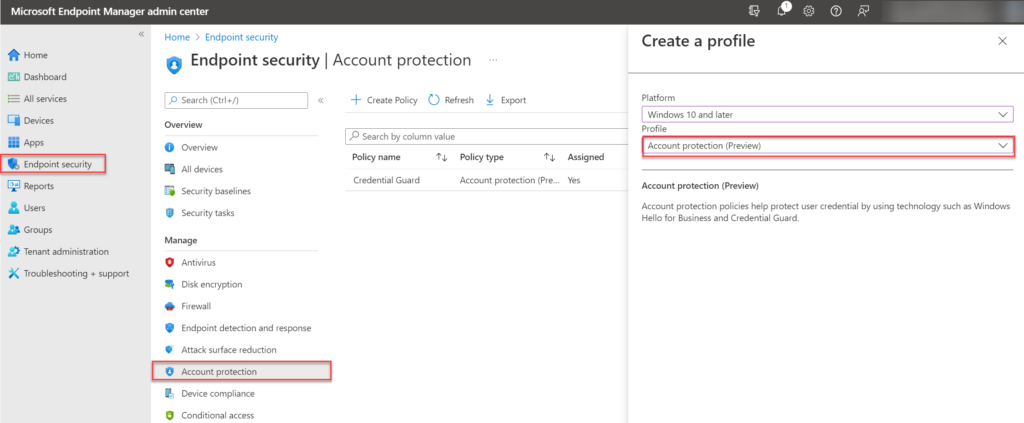
Configure the value; Turn on Credential Guard with the state; Enable with EUFI lock. The EUFI lock prevents the disablement of the Credential Guard.

More information, prerequisites, and other deployment options can be found here: Manage Windows Defender Credential Guard
| Recommendation: Always enable Credential Guard for supported machines. It prevents credential-based attacks. |
Windows Defender Application Control
Windows Defender Application Control (WDAC) allows controlling which applications and drivers can run in Windows. Application Control is a software-based layer that enforces only allowed software to run on a system.
Windows Defender Application Control in audit mode helps with collecting additional telemetry in Defender for Endpoint; See WDACme for more information.
For getting additional telemetry it is advised to run Windows Defender Application Control in audit mode based on the WDACme configuration.
Microsoft recommended block rules
Microsoft shared a recommended block rules list for WDAC and an additional driver block rules list.
WDAC will be explained more in-depth in one of the next blogs; it is an important topic and needed some more explanation where the configuration is based in XML and is likely to block apps when not correctly configured.
Conclusion
Part4B of the Microsoft Defender for Endpoint series is completed – focussed on the explanation of the additional protection features which are integrated with the Defender for Endpoint product.
Searching for specific Defender for Endpoint information? Use the contact submission form and share the post ideas or contact using Linkedin or Twitter. I will take all suggestions into the Defender for Endpoint series and help the community as far as possible.
View previous part – Microsoft Defender for Endpoint series – Define the AV policy baseline – Part4A
3 Comments
Leave a Reply

Great explanation of each part, thanks. Also big thanks for sharing your recommendations. This really helps. PS. Whats your opinion about the DFE security baseline within Intune ? Is it sufficient, does it need to be extended ? Can the settings from the baseline also be used as recommendation for Servers ?
Will ASR-Policies configured in Intune also apply on devices that are not managed with “Microsoft Endpoint Manager”? If the only have with Defender for Endpoint installed and “Use MDE to enforce security configuration settings from MEM” is enabled?
ASR is currently not supported in the “Use MDE to enforce security configuration settings from MEM” profile.
The below configurations are currently supported:
Antivirus policies
Firewall policies
Firewall rule policies
Endpoint detection and response policies
More information in part 4 of the series; https://jeffreyappel.nl/microsoft-defender-for-endpoint-series-configure-av-next-generation-protection-part4/