Recently Microsoft announced a new firmware scanning feature in Defender for IoT. With the new Defender for IoT Firmware analysis, it is possible to upload firmware images for security analysis and checking against vulnerabilities and weaknesses.
Currently, the feature is released in public preview. The Defender for IoT Firmware Analysis feature is automatically available when the Defender for IoT is opened via the Security Admin, Contributor, or Owner role. More information related to the permission model is explained in this blog.
This new tool comes from the Refirm Labs acquisition and is now integrated into the Defender for IoT stack. Let’s explore this new feature more in-depth.
| Blog information: Blog published: July 27, 2023 Blog latest updated: July 27, 2023 |
Defender for IoT Firmware Analysis
Defender for IoT Firmware analysis is a new feature included in the Defender for IoT portal. With the new feature, it is possible to get visibility into the vulnerability posture of devices. This feature is really useful since there is no need to deploy anything, there is no Defender for IoT agent required or additional tooling for scanning the firmware. This is especially interesting for appliance-level devices where you can’t install EDR toolings/ IoT sensors or a vulnerability scanning agent.
Compared with network traffic analysis, the firmware analysis gives more in-depth results. This feature is useful when you build the firmware in-house or receive firmware from the supply chain – before it was difficult to review the firmware and check for potentially known vulnerabilities. Based on recent attacks; never trust the vendor or supply chain. And even when developing firmware by internal teams it is good to run additional checks against known weaknesses and vulnerabilities.
Modern solutions and black box for IoT/ OT devices
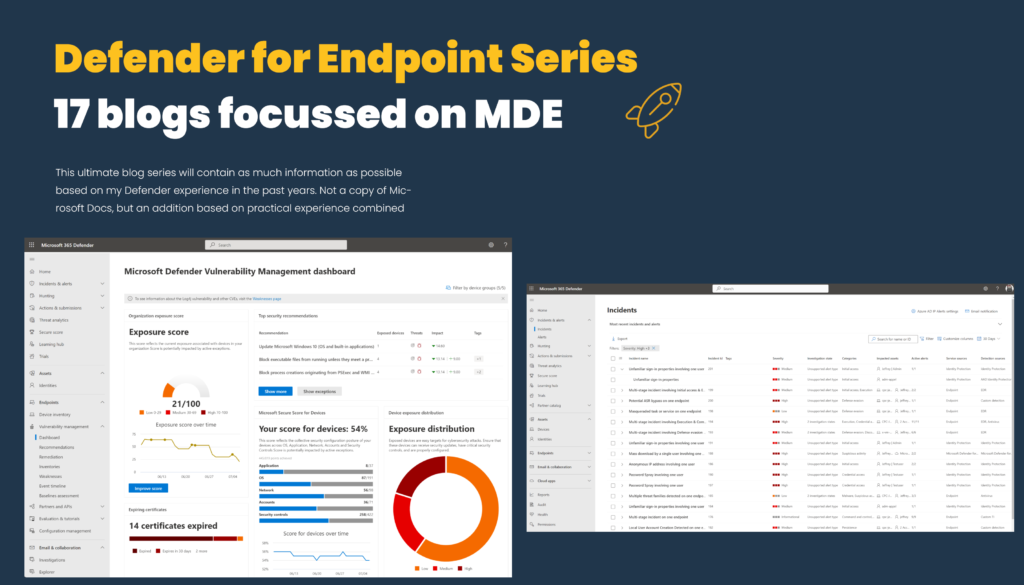
With modern endpoint solutions, Defender for IoT capabilities, and EDR solutions, IT and security analysts can get visibility into the software inventories and vulnerabilities. A good example is Defender for Endpoint where the Threat Vulnerability Management gives a broad view of the threat scope for application/ drivers and hardware components.
For IoT and OT devices without an agent, it is more of a black box, without full in-depth insights into the known vulnerabilities and potential anomalies around the firmware. Good examples are vulnerable open-source packages/ hardcoded user accounts or manufacturers’ private signing keys.
How works the Firmware Analysis
The new Defender for IoT Firmware Analysis runs the analysis based on the uploaded binary firmware images. For running the analysis there is no additional agent needed.
The firmware image must have the following prerequisites:
- Compiled firmware image
- Firmware image is unencrypted and Linux-based
- Firmware image is less than 1GB in size
When the firmware is uploaded it will upload the firmware image to a configured selected region. After the upload, it will perform the analysis. The analysis time will vary based on the size of the firmware image and the number of files discovered in the image.
In general, the following high-level steps are taken:
- Firmware image uploaded via Defender for IoT portal
- Firmware stored in the configured region
- Microsoft extracts the firmware images (status Extracting)
- Microsoft performs the analysis (status analysis)
- Microsoft will show the firmware analysis when the status is ready (status ready)
Configure the Firmware Analysis workspace/ feature
First, it is important to configure the region for storing the firmware images and prepare the Firmware Analysis feature.
When opening the Defender for IoT portal it requires the following roles:
- Security Admin
- Contributor
- Owner role
When the SecurityReader role is assigned it is possible to give permissions to the following role for standalone access to the new FirmwareAnalysisfeature.
- FirmwareAnalysisAdmin
Configure the portal
Open the Azure portal and search for Defender for IoT. Firmware analysis is part of the Defender for IoT portal.
Open Firmware analysis (preview) in the right menu part of the Defender for IoT page.
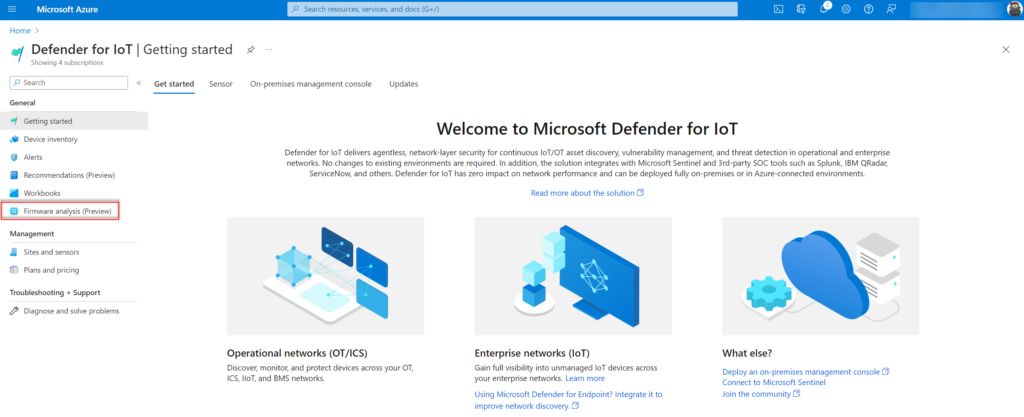
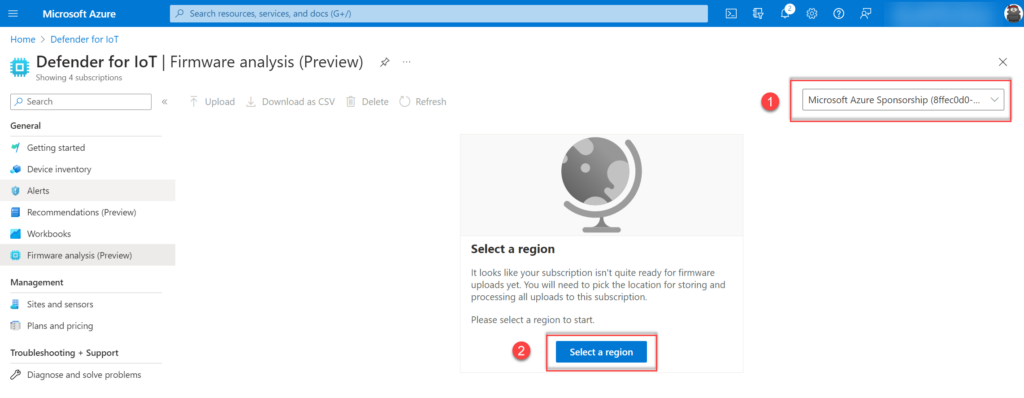
The first requirement is to select the subscription and configure the region. The region is needed for storing and processing all uploads.
1: Select the subscription
2: Configure the region
Currently, only the regions West Europe and East US are available:
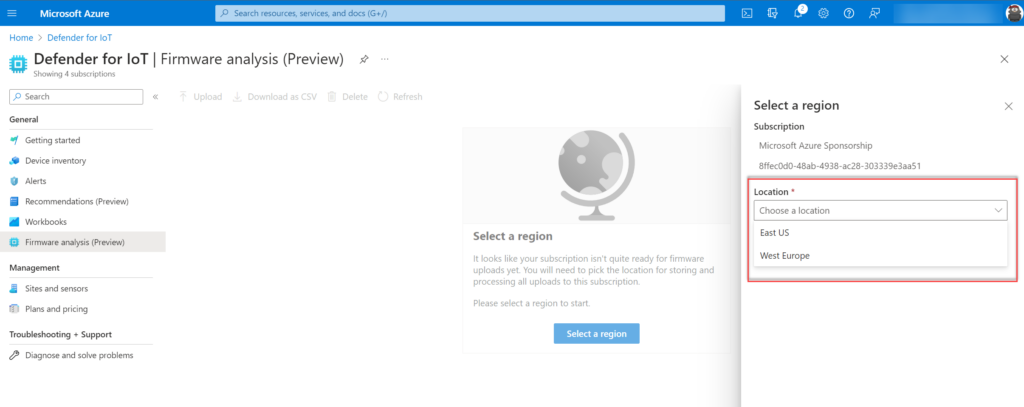
Set-up of workspace
On the backend the firmware analysis workspace will be created – it can take some time before the workspace is created. When the region is configured the result is a new Resource group in Azure with the name convention: FirmwareAnalysisRG and a workgroup with the name default.
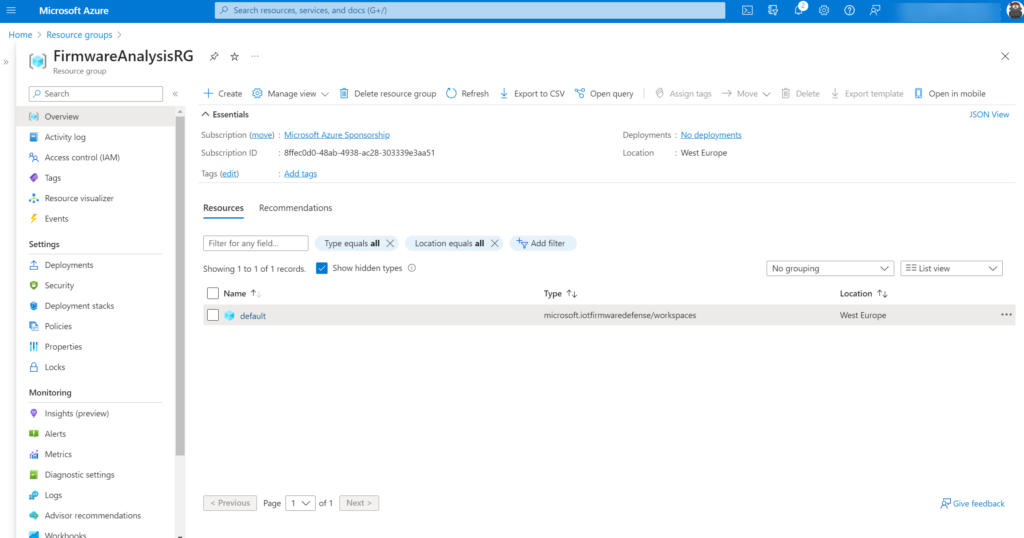
Upload the firmware images
When the workspace is created we are ready to upload the first firmware image. Navigate to the Firmware analysis (preview) blade in Defender for IoT and upload the firmware images using the upload button.

Firmware requirements
- Compiled firmware image
- Firmware image is unencrypted and Linux-based (encrypted images will not work)
- Firmware image is less than 1GB in size
Let’s start with a recent firmware image of the Ubiquiti Dream machine. Upload the firmware image and fill in the Vendor/ Model/ Version and optional description for reference and visibility.
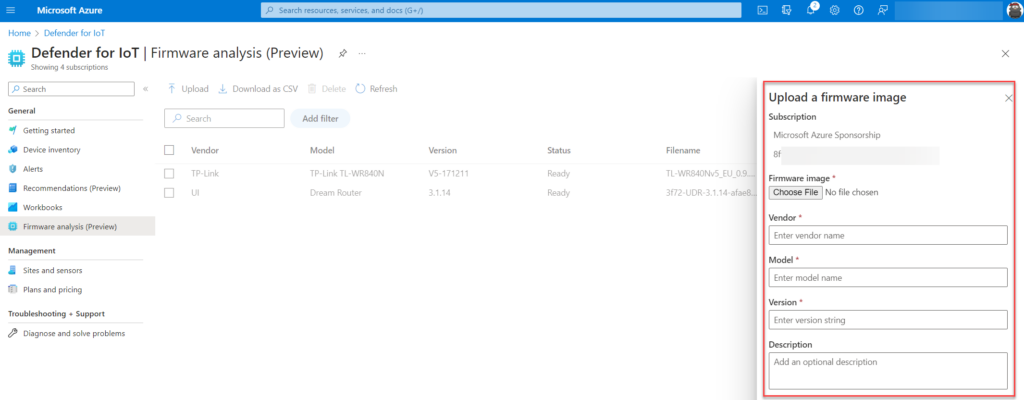
Step 1: Extracting the uploaded firmware
During step 1 the firmware file will be extracted on the backend of Microsoft.
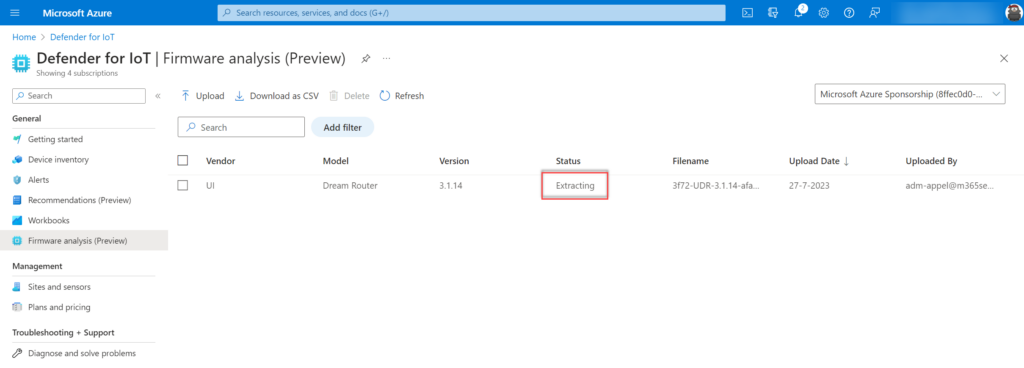
Step 2: Firmware analysis
During Step 2 the firmware will be analyzed. This step can take some time (depends on the size of the firmware and type of files).
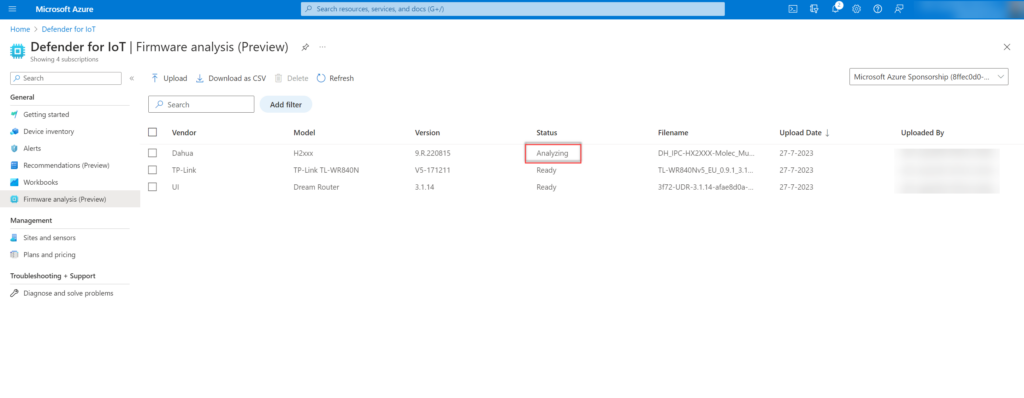
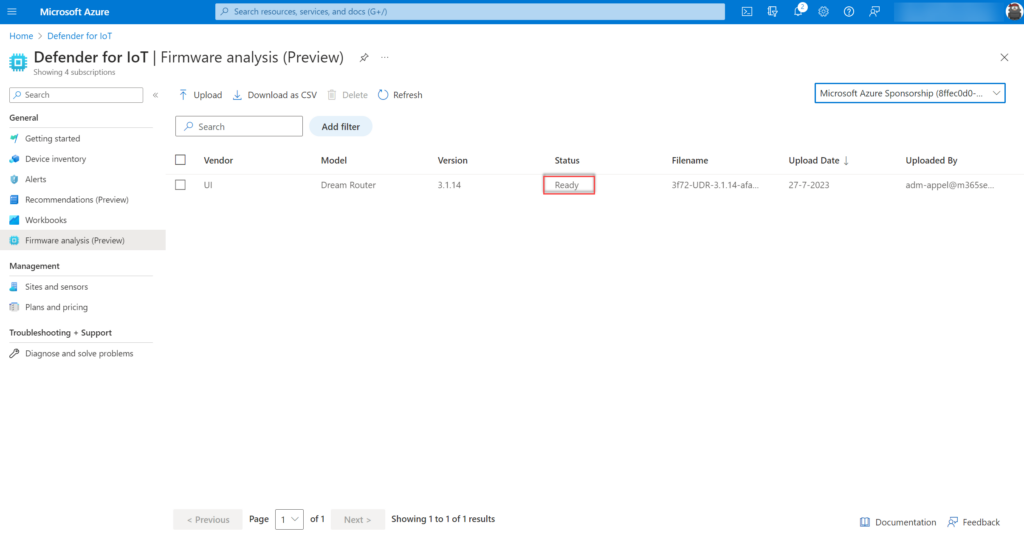
Step 3: Firmware is ready
During step 3 the firmware will be ready. When the status is showing Ready the report is ready and the firmware analysis is completed.
When clicking on the item the analysis details are visible. As an example, we uploaded the Ubiquiti UI Dream Router firmware (recent version). Defender firmware analysis is showing the following information as a result of the scan. Microsoft scanned the file in 2 minutes and 4 seconds.
- Total extracted size: 64.9 MB
- Root file system: 0
- Firmware file size: 556.3 MB
- Files extracted: 2.077
- Analysis duration: 2 min 4 sec
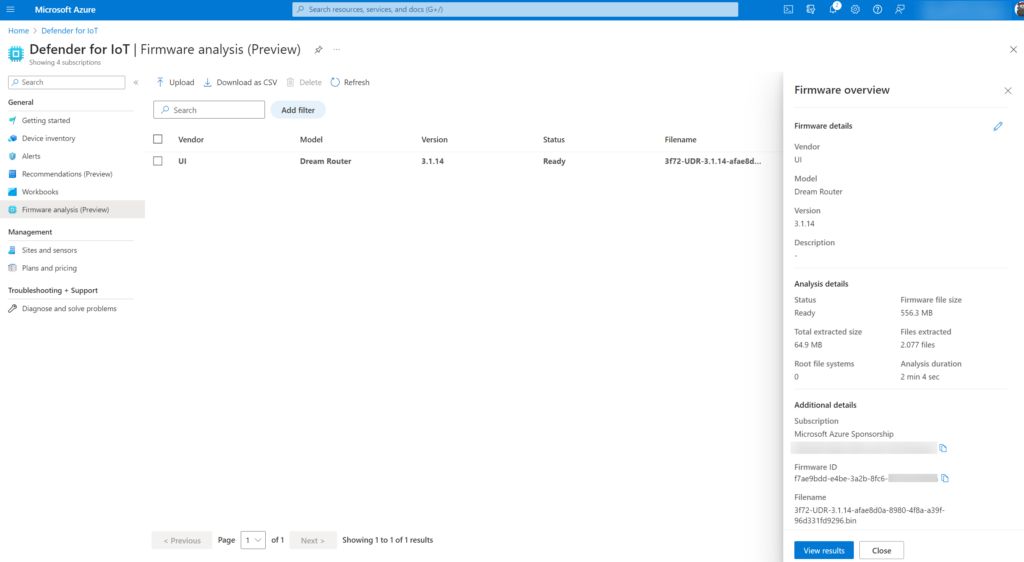
Part of the analysis is the button View results with the results view the vulnerability analysis will be opened with more in-depth security insights around the discovered vulnerabilities and findings.
Vulnerability report
When the result is ready and the View Results button is clicked all items are visible. What can be wrong with a recently released firmware for the UniFi OS Dream Router 3.1.14?
Teaser; it is not good and I was surprised with the results from discovered CVEs.
Firmware download link: https://community.ui.com/releases/UniFi-OS-Dream-Router-3-1-14/a8c131a2-7045-414f-9144-42b252ba8288
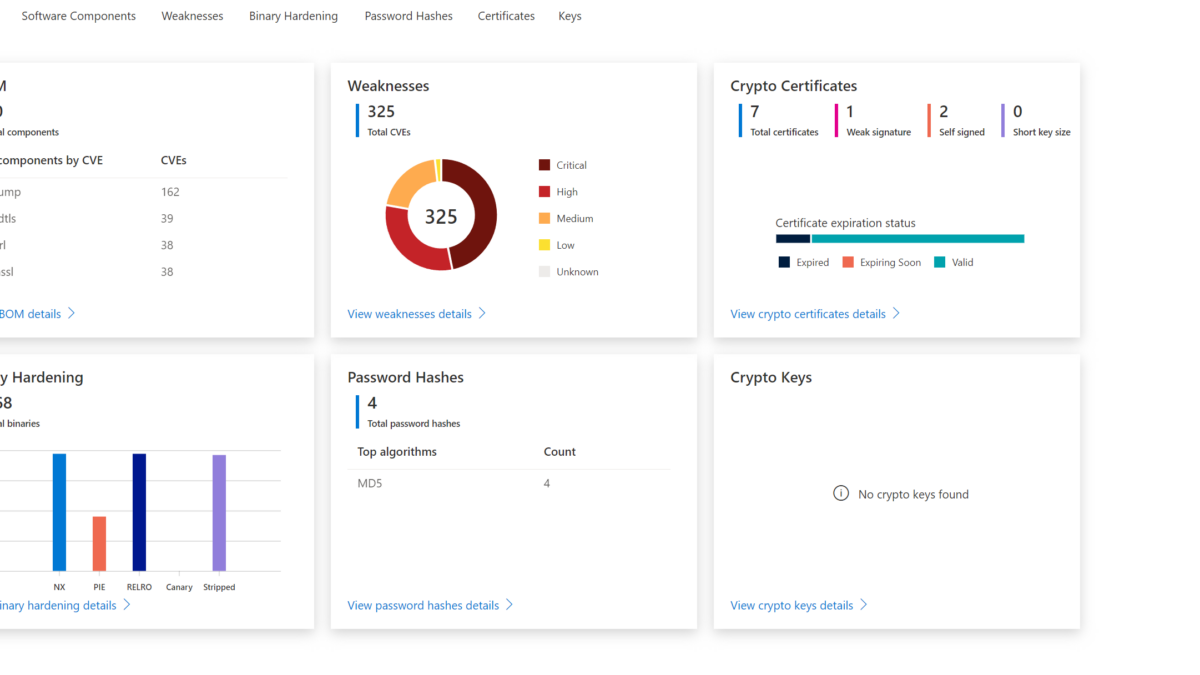
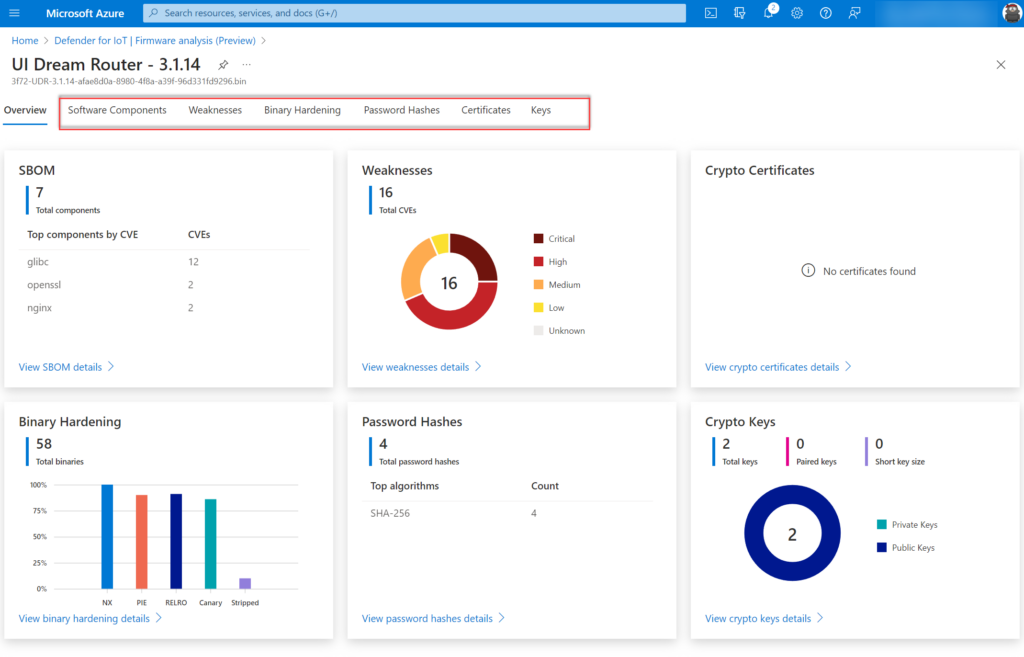
It starts with an overview page based on 6 widgets: The 6 widgets are based on the following information:
| Item | Explanation |
| SBOM (Software bill of materials) (1) | A detailed listing of open-source packages used during the firmware’s build process. |
| CVE analysis (2) | Firmware components have publicly known security vulnerabilities and exposures. |
| Binary hardening analysis (3) | Identify binaries that haven’t enabled specific security flags during compilation like buffer overflow protection, position independent executables, and more common hardening techniques. |
| SSL certificate analysis (6) | Reveal expired and revoked TLS/SSL certificates. |
| Public and private key analysis (5) | Verify that the public and private cryptographic keys discovered in the firmware are necessary and not accidental. |
| Password hash extraction (4) | Ensure that user account password hashes use secure cryptographic algorithms. |
From the dashboard view the first insights are visible. Based on the dashboard we can directly see that the component glibc is used with 12 CVEs. In the weaknesses breakdown we see that a major count is part of the critical severity.
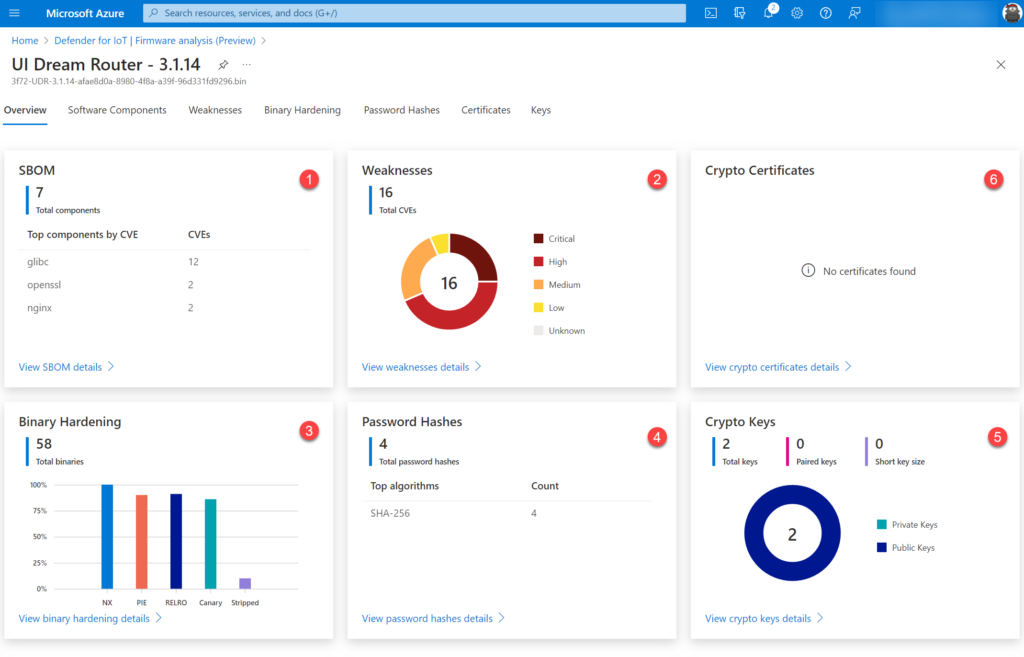
Each component is explained more in-depth in the specific subpages.
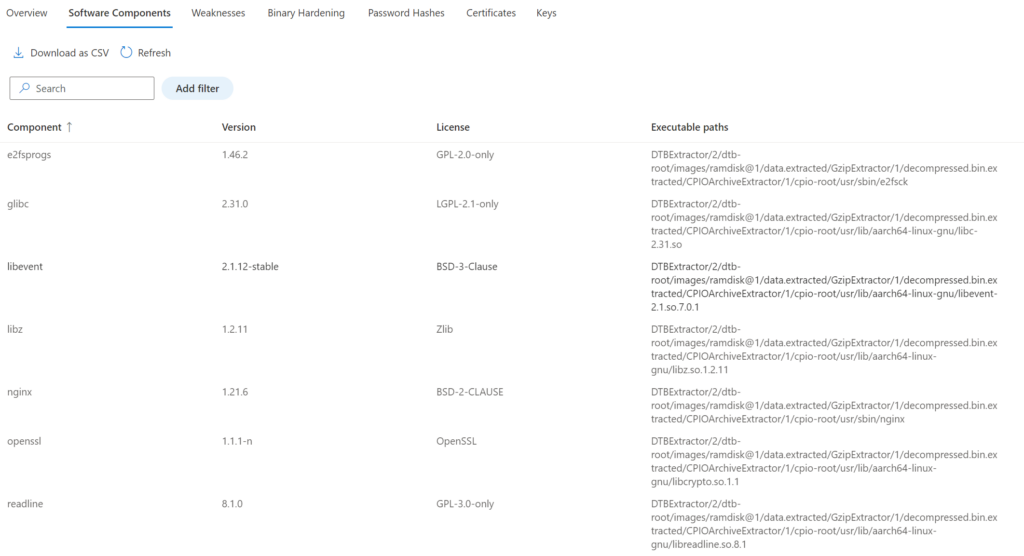
Software components
List of the software components, version, and executable paths part of the image. With this view there is insight into the used components part of the firmware. The below examples show the component OpenSSL and the executable paths of the firmware.
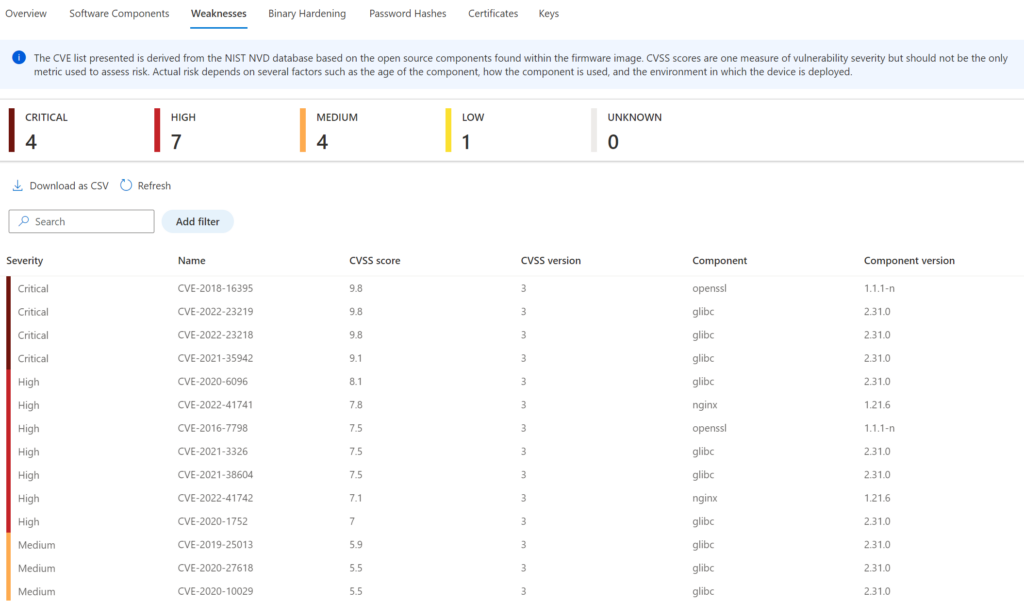
Weakness
Shows the weakness score for the detected components. The CVE list is derived from the NIST NVD (The NVD is the U.S. government repository of standards based vulnerability management data represented using the Security Content Automation Protocol (SCAP) database based on the open-source components. For the Ubiquiti UniFi UI Dream Router firmware, there are a couple of critical weaknesses detected related to the OpenSSL/glibc component.
Detailed page shows the CVSS score/ CVSS version/ Component and Component version:
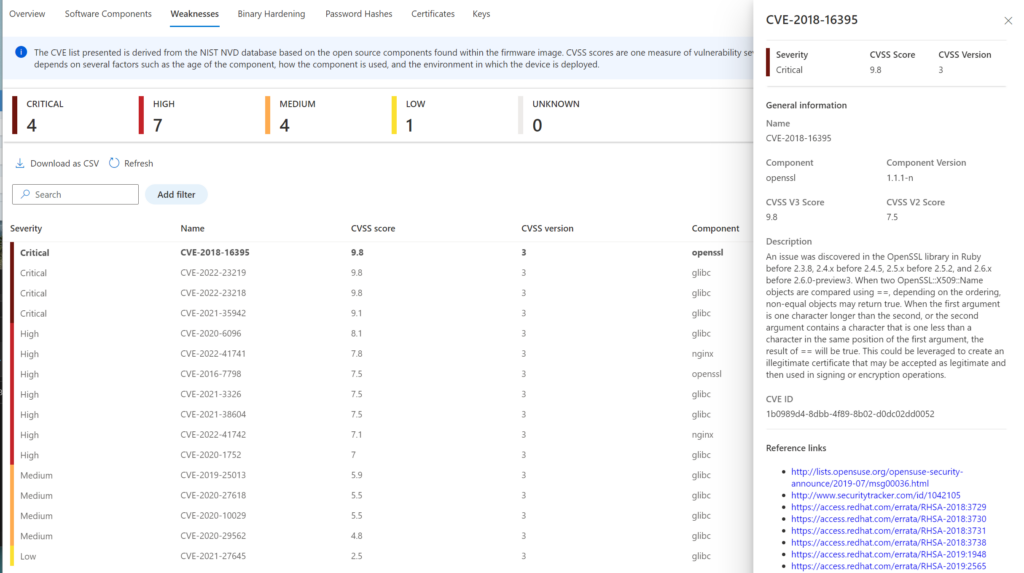
Detailed view of the specific CVE:
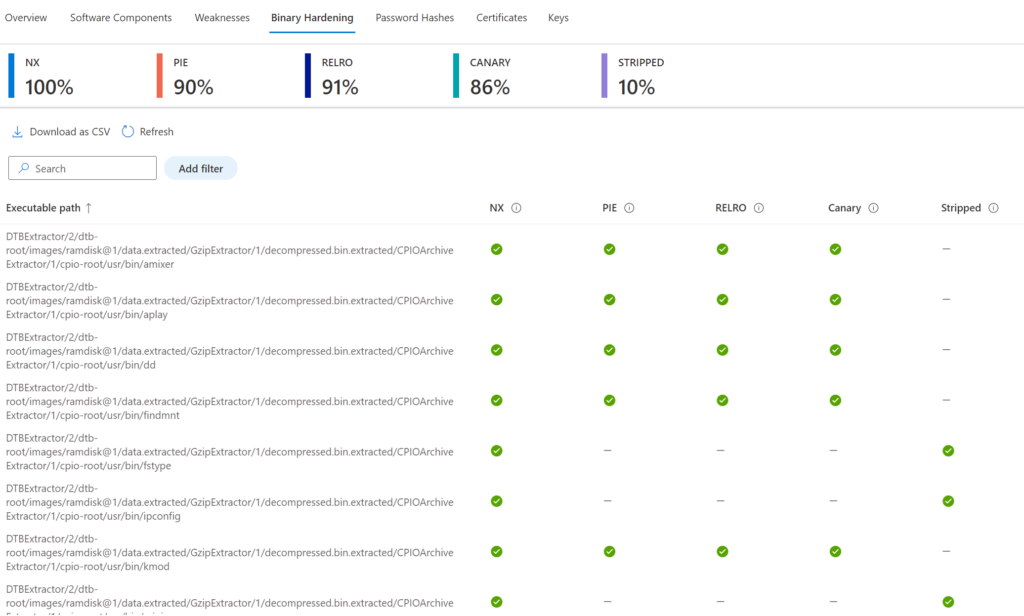
Binary hardening
Binary hardening shows the common hardening techniques and binaries that haven’t enabled specific security flags. Currently, Microsoft supports the following recommended security settings: NX, PIE, RELRO, CANARY, STRIPPED
Microsoft “After identifying vulnerabilities, firmware analysis goes a step further by assessing binary hardening. It looks at how the code that runs the device was built, and whether it conforms to security best practices such as Stack Canaries. Binary hardening analysis shows the difficulty or ease of possible binary exploitation and is also a good proxy for the overall security hygiene taken by the manufacturer” More information is available here: Analyze IoT/OT device firmware with Microsoft Defender for IoT
Mitigations like RELRO, NX, Stack Canaries, and PIE are basic mitigation measures. With the binary hardening analysis there is an overview of the security hygiene and applied hardening in the firmware.
NX: stands for “Non-Execute”. NX markets areas of the program as non-executable. This implies that stored input or data cannot be executed as code.
PIE: stands for “Position Independent Executable”. This indicates that the executable was built in such a way (PIE) that the “text” section of the program can be relocated in memory.
RELRO: stands for “Relocation Read-Only”. RELRO is a generic mitigation technique to harden the data sections of an ELF binary/process. More information: Hardening ELF binaries using Relocation Read-Only (RELRO)
Stack Canary: is used to detect a stack buffer overflow. A Stack Canary is a “secret value” placed on the stack which forces a change when the program is started.
Blog tip: Check the following medium post: Linux binary security hardening
Password Hashes
The Password Hashes data view gives visibility to the embedded accounts and associated password hashes part of the firmware. Select the user account for more information. In the example of the UI firmware the users; root and UI are embedded in the firmware.

Detailed view:

Certificates
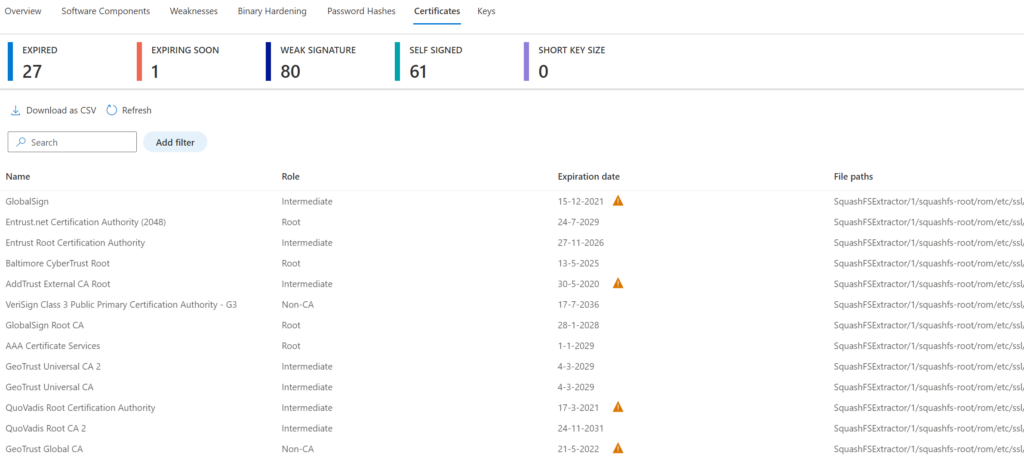
Certificates give visibility in the TLS/ SSL certificates part of the firmware. Each certificate item can be opened for more in-depth information. There is a breakdown between Expired; Expiring Soon; Weak signature; Self-signed; short key size certificates.
Keys
Keys gives an overview of the public and private crypto keys in the firmware. Each key item can be opened for more in-depth information.

Examples
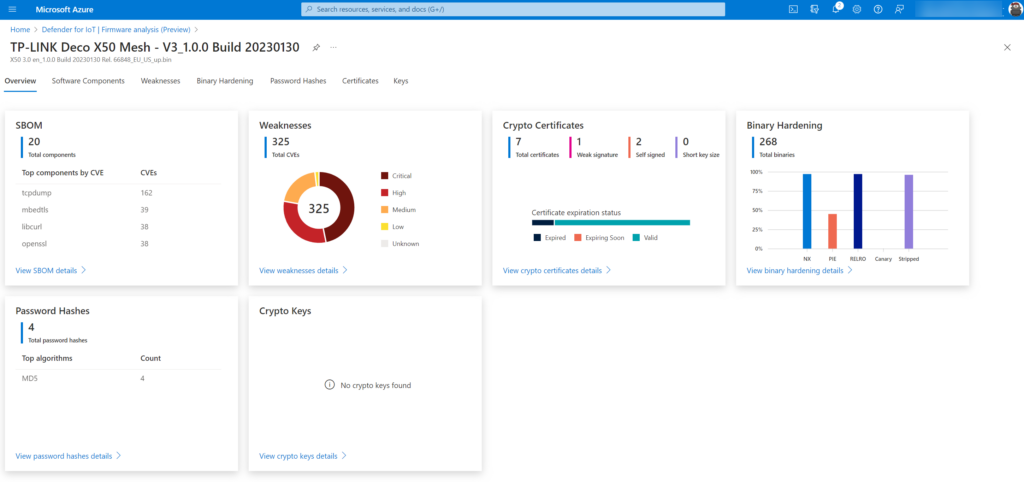
TP-Link Deco X50 Mesh product with older firmware scanned, this mesh product is popular for consumers/ home networks – since most of the consumers are just using the product. For normal consumers; why update when the product is working fine (-;
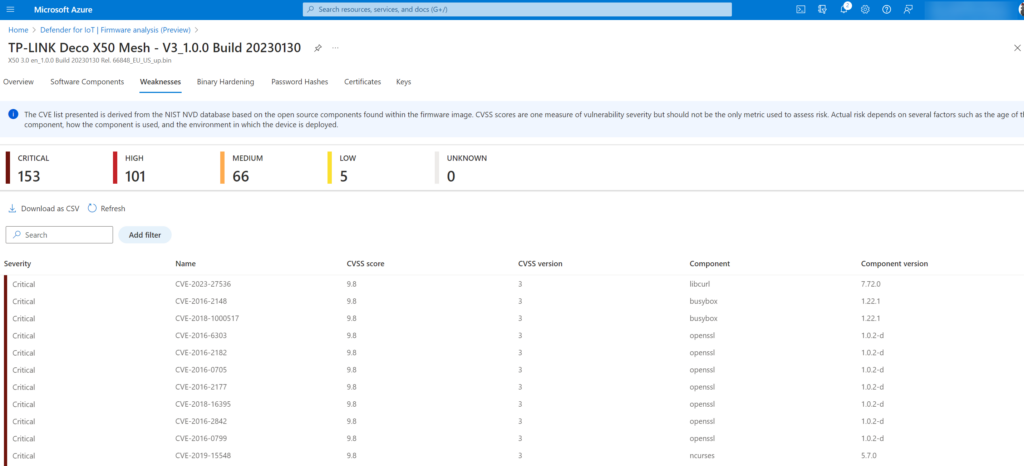
325 total CVEs and 153 critical!! – 162 CVEs in the tcpdump component. Since this is a popular product – for sure this is used in the wild with other products. CVEs from 2016 with CVSS score of 9.8!
Botnet example
The Mirai botnet was a good example. The malware part of the Mirai botnet was leveraging over 60 default usernames and passwords to take over IoT devices and used them to perform mass Distributed Denial of Service (DDoS) attacks. The Dark.IoT botnet is a new variant based on the Mirai botnet. TP-Link routers were massively under attack from the Dark.IoT botnet.
More information: TP-Link TL-WR840N EU v5 Remote Code Execution
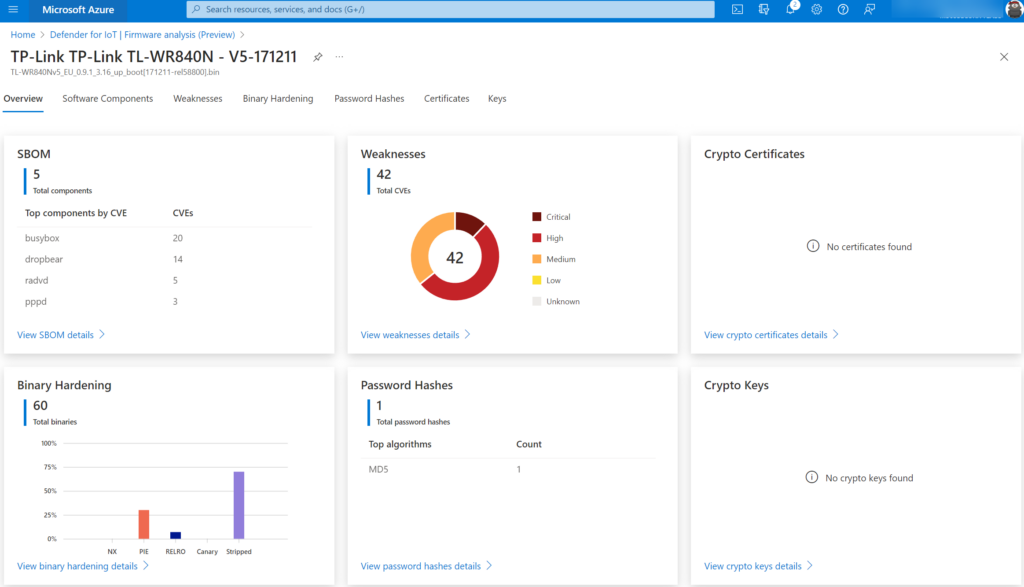
Following Fortinet, Dark.IoT operators are most likely using the default passwords to access devices and use a bug (see above remote code execution) to gain full control of the devices. Most of them were unpatched since the internal components were vulnerable.
It was not only TP-Link since other vendors were attacked (Cisco, Dlink /MicroFocus routers, and many more). With the recently growing abuse of IoT/ OT devices, it is important to make sure the firmware is patched and no vulnerabilities are exploited. The new firmware capability in Defender for IoT makes this flow easier for checking against known vulnerabilities/ misconfiguration.
Conclusion
Checked a couple of IoT devices from my home network, and even when running the latest firmware there is a huge amount of detected vulnerable CVEs and misconfigurations.
My favorite part of this new feature is how simple the firmware scanning feature is configured – there is no sensor/ agent required and the firmware can be downloaded from the vendor site and manually uploaded to the firmware analysis page for viewing the report and findings.
Sources
Microsoft: Analyze IoT/OT device firmware with Microsoft Defender for IoT
Microsoft: Firmware analysis for device builders
Microsoft: Analyze an IoT/OT firmware image

