It is time for part 4A of the ultimate Microsoft Defender for Endpoint (MDE) series. Part 4 explains the AV/ next-generation protection component. Now it is time for some more detailed policy explanation, what do we need to enable, which setting is recommended and where is impact expected?
NOTE: The blog series focuses on features in Microsoft Defender for Endpoint P2 all Microsoft Defender for Endpoint P1 features are available in P2.
Specific question or content idea part of Defender for Endpoint? Use the contact submission form and share the post ideas.
Introduction
Microsoft Defender Antivirus is Microsoft Defender for Endpoint’s ‘next-generation protection component‘ that combines machine learning, big data analysis, threat research, and Microsoft’s cloud infrastructure to protect devices more in-depth with additional layers based on behavior, heuristics, and real-time protection.
For more AV/ NGAV information see; Microsoft Defender for Endpoint series – Configure AV/ next-generation protection – Part4
What are the additional configurations?
Next to the configuration in Defender for Endpoint (security.microsoft.com), there are more additional configurations available related to Defender for Endpoint:
Next-generation protection/ Defender AV
- Cloud protection
- Real-time protection
- Block at first sight
- Signature update settings
- Scan settings
- Additional AV configuration
Attack surface reduction
- Attack Surface Reduction (ASR) Rules
- Controlled folder access
- Device control
- Exploit protection
- Network protection
- Web protection
- Ransomware protection
- Application control
- HW-based isolation
Additional Defender protections
- Windows Defender Credential Guard
- Microsoft Defender SmartScreen
- Windows Defender Firewall
Cloud protection
As already explained in the previous part; cloud protection is critical and needs to be enabled correctly.
Cloud protection is available based on 4 pre-configured levels;
- Not configured
- High
- High Plus
- Zero Tolerance
Zero Tolerance is blocking all unknown executables and is useful for the real restricted endpoints. Based on my experience High is average good protection; where High Plus uses extra protection measures.
| Recommendation: High plus when possible; or at least High. Never disable/ not configure Cloud protection; without Cloud protection enabled there is a lack of protection and MDE functionalities. |
Configuration using Intune

Use Endpoint Security -> Antivirus -> Profile: Microsoft Defender Antivirus and configure:
| Setting | Configuration |
| Allow Behavior Monitoring | Allowed |
| Allow Cloud Protection | Allowed |
| Allow Realtime Monitoring | Allowed |
| Cloud Block Level | High/ High Plus |
Sample submission
Sample submission is a key component of Cloud protection and sends file metadata to the cloud protection service when Defender Antivirus cannot make a clear determination based on the client-based machine learning models or local behavioral analysis. When the Defender Antivirus cloud protection cannot reach a verdict for the specific file; it can request a sample for further inspection.
How works sample submission/ Cloud-delivered protection feature: Source Microsoft
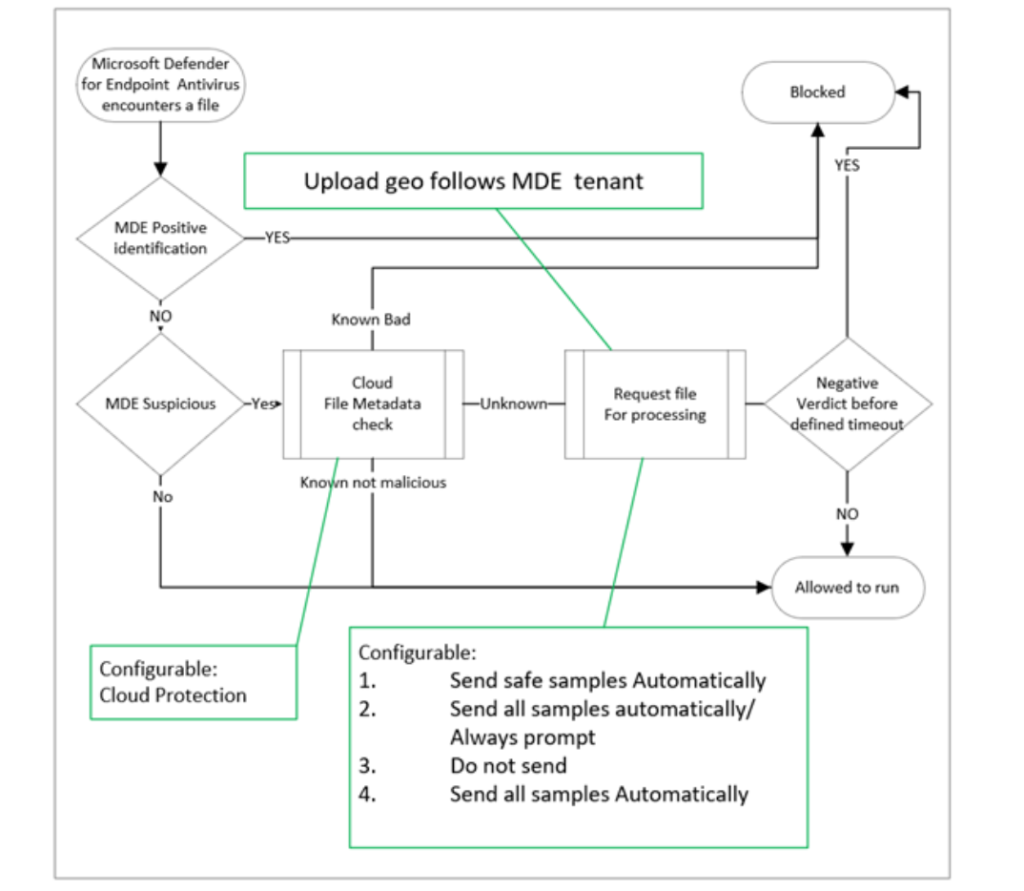
There are 4 levels of sample submission;
| Sample submission | Description | User notification for submission? |
|---|---|---|
| Send safe samples automatically | Send safe samples considered to not contains PII data | Yes |
| Always Prompt | The users will always be prompted for consent before any file submission | Yes |
| Send all samples automatically | All samples will be sent automatically, without any additional prompt for the users | No |
| Do not send | Prevents the complete ‘block at first sight’ feature |
| Recommendation: Send safe samples automatically or send all samples automatically. Send safe gives a prompt when the user needs to submit data with PIII files. Sens all samples automatically is sending all files without any prompt. Choose one of the options. NEVER use the option “Do not send” which disables the complete feature. When Sample submission is disabled; BAFS is also disabled and file analysis is limited to metadata only. |
More information: Cloud protection and sample submission at Microsoft Defender Antivirus
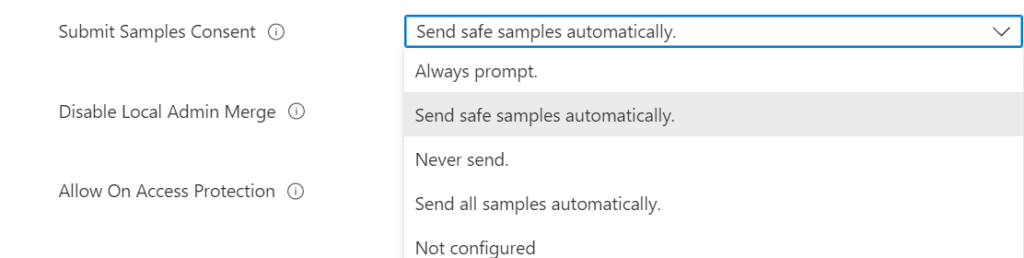
Configuration using Intune
Use Endpoint Security -> Antivirus -> Profile: Microsoft Defender Antivirus and configure the setting Submit Samples Consent
Cloud block timeout period
Cloud Extended Timeout is a configuration where Defender Antivirus can prevent the file from running while it queries the verdict against the Defender Antivirus cloud service. By default; Microsoft blocks the file for 10 seconds. Extending the cloud block helps to receive a good result from the cloud service.
Cloud Extended Timeout can be configured in seconds from 1 second to 50 seconds. Each configured time is added to the default 10 seconds. 50 makes the timeout 50+10= 60 seconds.
| Recommendation: Configure 50 seconds additional timeout. |
Intune
Use Endpoint Security -> Antivirus -> Profile: Microsoft Defender Antivirus and configure the setting Cloud Extended Timeout

Block at first sight
The combination of the above three settings enables block at first sight (BAFS). Block at first sight detects new malware and blocks it within some seconds. For getting BAFS enables it is needed to configure the above items; Cloud protection; submission timeout, and file blocking level of high or more strict (high+/ Zero-tolerance). When all items are configured Block at first sight is correctly enabled.
| Recommendation: Enable BAFS with the combination of the above features. |
Scan options
Daily quick scan
Some years ago there was a ‘best practice’ for scanning weekly the full scan drive. The full scan gives overlap and takes time and resources from the system. With the use of all cloud protection features and Automated Investigation, there is no need for scheduling the full scan. Real-time/ cloud protection reviews all files that are opened and closed and any files that are in folders that are accessed by a user.
| Recommendation: Configure daily quick scan. Running a full scan once after you’ve just enabled or installed Microsoft Defender Antivirus can be useful to scan systems for the initial time and detect existing threats. |
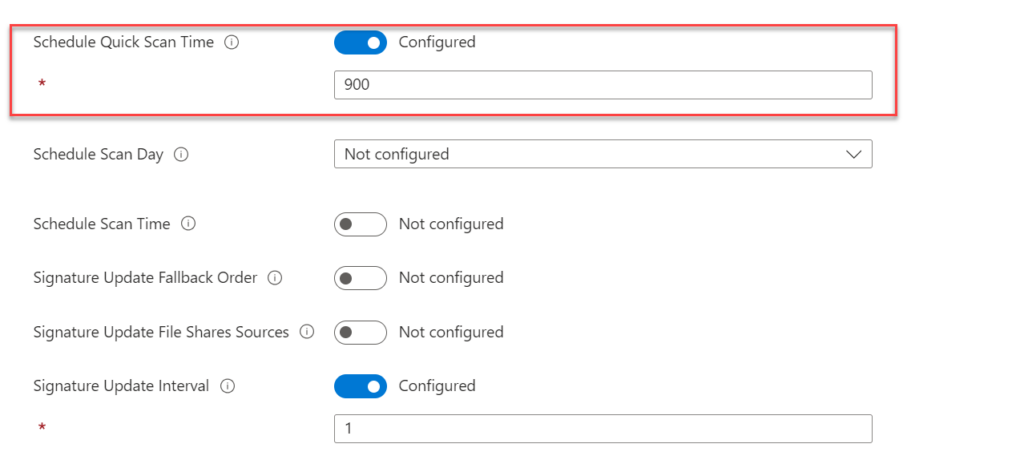
Configuration using Intune
Use Endpoint Security -> Antivirus -> Profile: Microsoft Defender Antivirus and configure the setting Schedule Quick scan Time.
Schedule Scan Day is not needed. Schedule Quick Scan Time runs each day during the configured time.
Other scan options
Defender Antivirus contains more scan features part of Defender AV.
Table based on MDE Endpoint Security profile
| Configuration | Recommendation |
|---|---|
| Allow Archive Scanning | Allowed |
| Allow Email Scanning | Allowed |
| Allow Full Scan on Mapped Network | Not Allowed |
| Allow Full Scan Removable Drive Scanning | Allowed |
| Allow scanning of all downloaded files and attachments | Allowed |
| Allow Scanning Network Files | Allowed |
| Allow Script Scanning | Allowed |
| Check for signatures before running scan | Allowed |
| Enable Low CPU priority | Enabled |
| AVG CPU Load Factor | 20% |
Signatures
Defender Antivirus relies on the daily available signature updates. KB2267602 deploys security intelligence updates multiple times a day. With the use of cloud-delivered protection, Microsoft can deploy signature updates or critical updates. You can check which are the current versions on this website or check the release notes for the frequency.
Defender Antivirus supports different sources for getting AV updates;
- Microsoft Update
- Windows Server Update Service
- Microsoft Endpoint Configuration Manager
- Network file share
- Security intelligence updates for Microsoft Defender Antivirus and other Microsoft anti-malware
Common mistake; Sometimes customers slow down the frequency of the updates for “skipping” bad updates. Microsoft pushed immediate corrections when there were huge issues. With rapid frequency; the update is asap fixed with the newly released update. When configuring 48 hours; it takes hours before the fix is applied.
IMPORTANT: Do not use WSUS/SCCM for the primary configuration of Defender AV signature updates. When using WSUS/ SCCM you need to first sync the updates from the catalog (mostly daily or even weekly), after the sync it deploys to the system; now Microsoft releases a new patch with a critical fix; the customer needs to wait again for the update sync. WSUS/SCCM makes it complex, causing overhead and giving always issues.
Signature source
Avoid WSUS/ SCCM as configured update source. Ideally, use the MicrosoftUpdate source as the primary source to get updates directly from Microsoft.
| Recommendation: Use MicrosoftUpdate as the primary source. Avoid WSUS/ SCCM as the primary source for security updates. |
Configuration using Intune
For Intune, no additional configuration is needed for the AV signature source. The default configures the following update order; MicrosoftUpdateServer|MMPC
Signature update interval
How quicker the interval is configured; how smaller the package is in size. Waiting some hours/ days makes the delta larger; with the interval of 1-4 hours, the package is small and gives no network impact.
| Recommendation: Use the 1-hour interval for Defender signature updates. |
Configuration using Intune
Use Endpoint Security -> Antivirus -> Profile: Microsoft Defender Antivirus and configure the setting Signature Update Interval

Additional protection
Local Admin Merge
One of the most underrated policies, this policy needs personally enabled in each baseline. Without Local Admin Merge; administrators can manage the local AV exclusion list. Disabling Local Admin Merge applies only exclusions configured in the management tool (Intune, MECM…)
For both MDAV and Windows Firewall the “disable local admin merge” needs to be enabled. Otherwise, a local admin can bypass most of your protections part of Defender AV via the UI or PowerShell module. And yes; there are still some bypass options for the exclusions.
| Recommendation: there is no doubt about enabling this setting; when using the local admin merge watch out for apps that create rules during the installation; this needs to be managed centralized. (seen in practice with firewall rules) |
Configuration using Intune
Use Endpoint Security -> Antivirus -> Profile: Microsoft Defender Antivirus and configure the setting Disable Local Admin Merge with the value Disabled.

Disabled is disabling the Local Admin Merge feature and option for configuring local exclusions via the UI or PowerShell.
PUA protection
Potentially unwanted applications (PUA) is typically software that can cause slowness on the system, display ads, or installed other unwanted software, PUA is not considered a virus, malware, or other types of threats, but is mostly focused on endpoint performance or evasion software. Example of typical PUA detections:
- CCleaner
- Utorrent bundle
- Toolbar software
- Software with hidden ( toolbar) installations.
| Recommendation: Enable PUA and start with testing in audit mode and review logs/ Advanced Hunting for calculating possible impact. |
Configuration using Intune
Use Endpoint Security -> Antivirus -> Profile: Microsoft Defender Antivirus and configure the setting PUA Protection

Custom settings
A couple of settings are currently not available in the Intune AV policies and need to be created via custom policies. The following configurations are important:
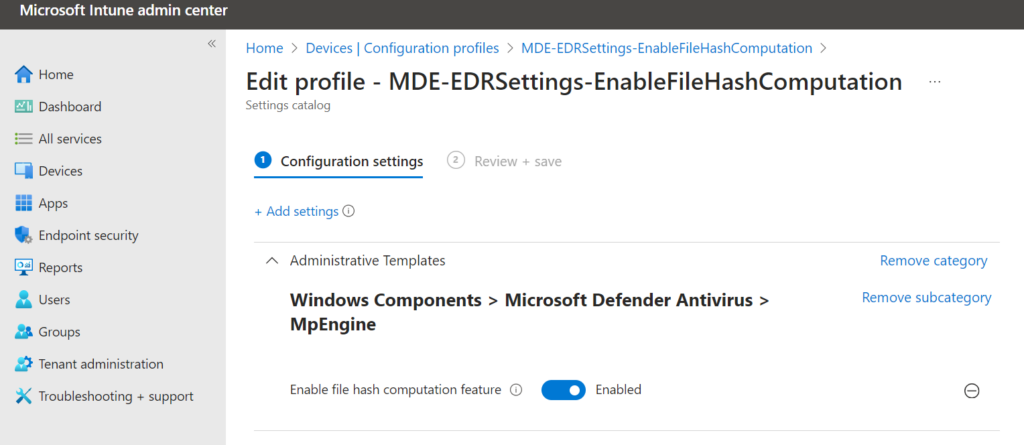
EnableFileHashComputation: The file hash computation adds a couple of benefits for the indicator mechanism for better/ faster marching of file indicators the collection of more hashes for files/ all files and better/faster matching for custom file indicators.
This setting requires additional testing since there can be some performance increase. May impact machines with large file transfers (file servers) – always test for performance!! This setting is a must for highly secure systems.
The setting can be configured via the Settings catalog in Intune:
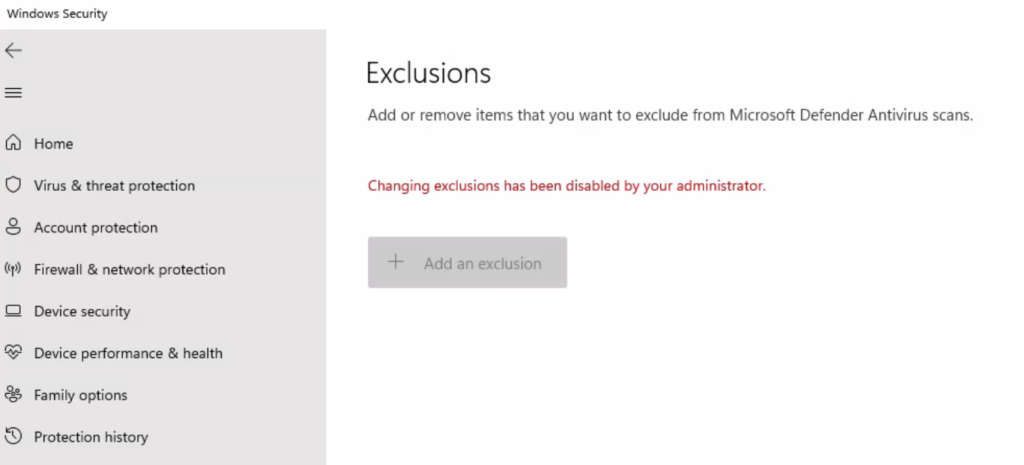
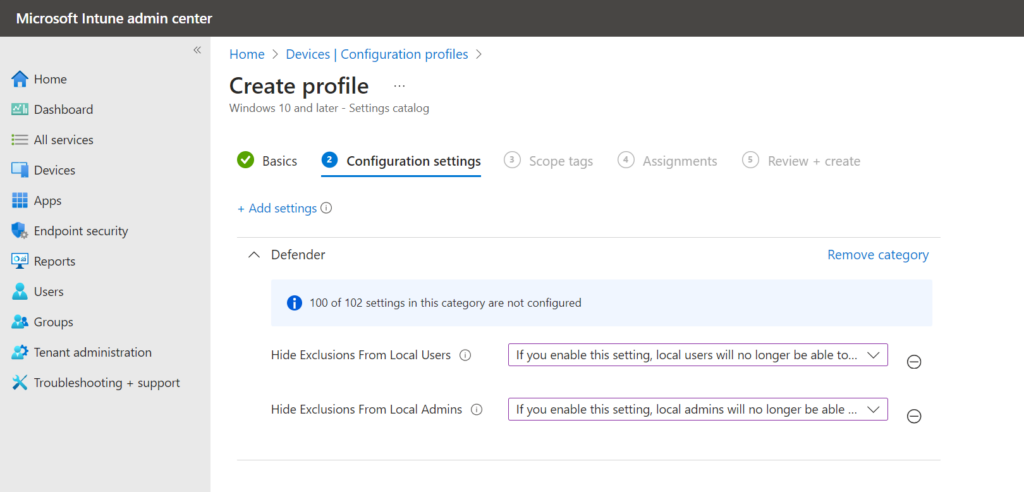
Disable exclusions for admins and local users: it is possible to restrict the view of exclusions for admins/ local users. When users are admin it prevents the policy manager in the registry, which results in less bypass to edit the configuration/ local exclusions. The following settings are available via the settings catalog in Intune:
- Hide Exclusions From Local Admins
- Hide Exclusions From Local Users
Network protection
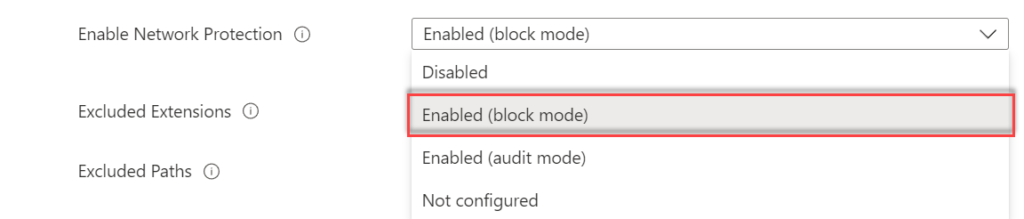
Network protection is critical in combination with Defender for Endpoint network indicators and web content filtering. For blocking indicators the Network protection feature must be enabled in block mode. Network protection is an attack surface reduction capability, and prevents access to dangerous domains or custom-blocked indicators.
The network protection component of Defender for Endpoint identifies and blocks connections to C2 infrastructures used in ransomware attacks. Blocking C2 attacks makes Network Protection more important.
For Microsoft Edge browsers SmartScreen must be enabled for working in cases with specific features. SmartScreen will be explained in the next blog part.
| Feature | Microsoft Edge | 3rd-party browsers | Non-browser processes (e.g. PowerShell) |
|---|---|---|---|
| Web Threat Protection | SmartScreen must be enabled | NP has to be in block mode | NP has to be in block mode |
| Custom Indicators | SmartScreen must be enabled | NP has to be in block mode | NP has to be in block mode |
| Web Content Filtering | SmartScreen must be enabled | NP has to be in block mode | Not supported |
For Network protection, the features real-time protection and cloud-delivered protection must be enabled and activated. Network protection optimization is enabled by default and can help with app compatibility problems and reduce bandwidth. -AllowSwitchToAsyncInspection is enabled by default.
For Windows Servers and Windows Multi-session additional configuration is required for network protection when not using Intune. Recently Microsoft added new policies and includes the following new policies:
- Allow network protection Down Level
- Allow Datagram Processing on Win Server
With the new policies, it is possible to set the below keys automatically via Intune/ MDE Management.
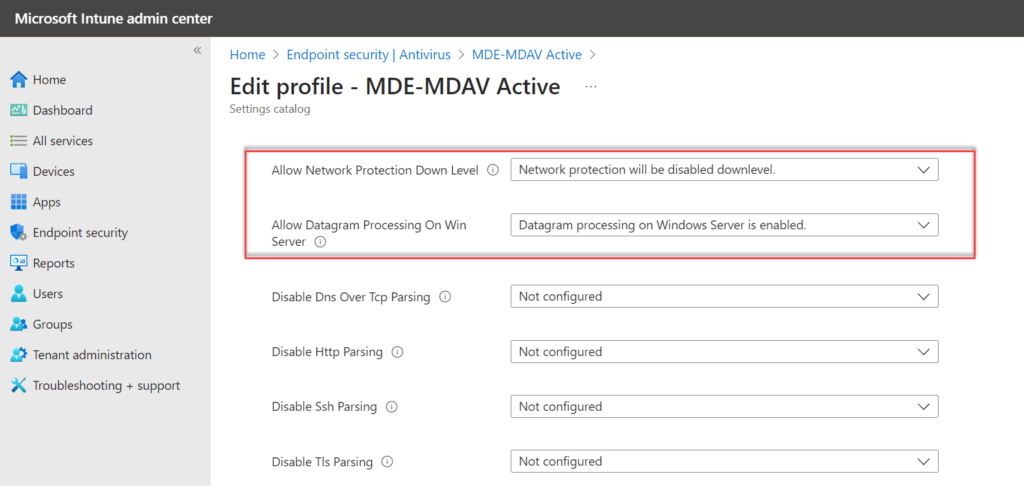
Test always the setting; AllowDatagramProcessingOnWinServer which is scoping on inspection of UDP connections on Windows Servers on high load servers (Exchange, SQL..)
Set-MpPreference -EnableNetworkProtection Enabled
Set-MpPreference -AllowNetworkProtectionOnWinServer 1
Set-MpPreference -AllowNetworkProtectionDownLevel 1
Set-MpPreference -AllowDatagramProcessingOnWinServer 1 | Recommendation: Enable Network protection in block mode. Audit mode can be used for evaluating first. Important: Audit mode is not blocking any website or network traffic. |
Configuration using Intune
Use Endpoint Security -> Antivirus -> Profile: Microsoft Defender Antivirus and configure the setting Enable Network Protection
Tamper Protection
Tamper Protection must be enabled. Ideally, enable Tamper Protection in MDE. See the earlier part of this series for the Tamper Protection enablement via security.microsoft.com. Don’t disable or not use Tamper Protection. Troubleshooting mode can be used for troubleshooting situations.
Blog: Microsoft Defender for Endpoint Troubleshooting mode – how to use it?
Bad actors like to disable your security features to get easier access to data, install malware, or exploit your data, identity, and devices.
Tamper Protection prevents against the following actions:
- Disabling virus and threat protection
- Disabling real-time protection
- Turning off behavior monitoring
- Disabling antivirus protection, such as IOfficeAntivirus (IOAV)
- Disabling cloud-delivered protection
- Removing security intelligence updates
- Disabling automatic actions on detected threats
- Suppressing notifications in the Windows Security app
- Disabling scanning of archives and network files
Tamper protection for exclusions
When enabled Tamper Protection via Intune and the Defender service settings there is additional protection for exclusions in combination with the DisableLocalAdminMerge policy. When enabled each exclusion added by other processes will be explicitly ignored.
When managed via Intune, it ensures that ONLY settings coming from Intune and its related processes are effective on the device. All settings from other methods/ applications or GPOs will be ignored. This prevents the default behavior of many applications in terms of adding unwanted exclusions on the background during the installation.
Validation
Under the registry key HKLM\SOFTWARE\Microsoft\Windows Defender\Features, find the value TPExclusions. A value of 1 means exclusions are being protected. A value of 0 or the absence of the value indicates it’s not yet enabled. Changing this key does not affect the protection being enabled. It should be used as an indicator only.
More information: Protect security settings with tamper protection
Validation
PowerShell can be used for validating the state of Defender for Endpoint. Use the following commands:
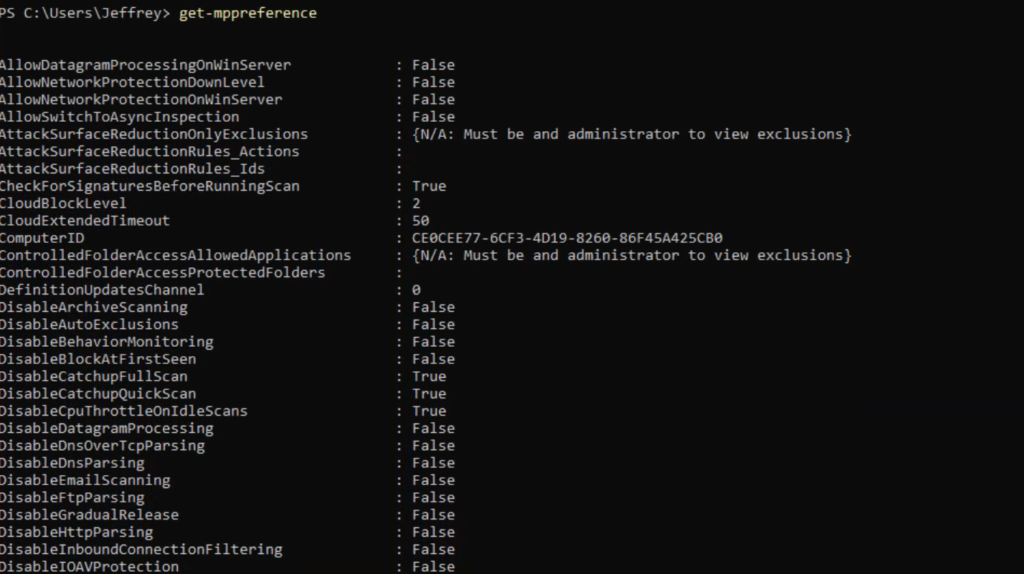
Get-MpPreference
Get-MpComputerStatus
Get-MpPreference shows the configuration of Defender AV. Check always of the key components are enabled:
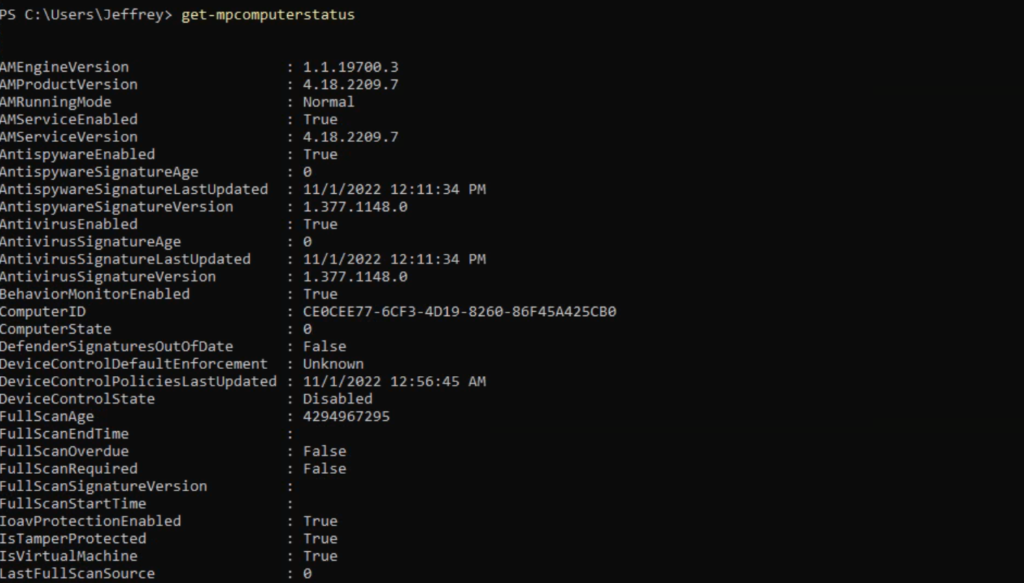
The Get-MpComputerStatus cmdlet gets the status of the Defender AV product.
PowerShell commands (example)
Example PowerShell script for configuring Defender AV. Important: only use PowerShell when no other management toolings are available. See part 4 for the available management options.
#Cloud protection
"Cloud DeliveredProtection level"
Set-MpPreference -MAPSReporting Advanced

"Set cloud block level to 'High"
 Set-MpPreference -CloudBlockLevel High

"Set cloud block timeout to 1 minute"
Set-MpPreference -CloudExtendedTimeout 50

"Cloud Delivered sample submission consent (Send All Samples)"
Set-MpPreference -SubmitSamplesConsent 3

"Block at first seen"
Set-MpPreference -DisableBlockAtFirstSeen $False

"Behaviormonitoring enable"
Set-MpPreference -DisableBehaviorMonitoring $False

"Realtime protection enabling"
Set-MpPreference -DisableRealtimeMonitoring $False

"Enable IOAV protection"
Set-MpPreference -DisableIOAVProtection $False

#SCANNING AV settings
"Configure Defender AV scan settings"
Set-MpPreference -scanAvgCPULoadFactor 20
Set-MpPreference -DisableScriptScanning $false
Set-MpPreference -DisableEmailScanning $false
Set-MpPreference -Disableremovabledrivescanning $false
Set-MpPreference -DisableCatchupFullScan $False
Set-MpPreference -DisableCatchupQuickScan $False
Set-MpPreference -DisableScanningMappedNetworkDrivesForFullScan $True
Set-MpPreference -RandomizeScheduleTaskTimes $True
Set-MpPreference -CheckForSignaturesBeforeRunningScan $True
Set-MpPreference -RealTimeScanDirection 0

#SCANNING AV SCHEDULE
"Configure scan schedule settings"
Set-MpPreference -SignatureUpdateInterval 1
Set-MpPreference -SignatureUpdateCatchupInterval 1

#SIGNATURE SCHEDULE
"Configure scan settings"
Set-MpPreference -ScanScheduleQuickScanTime 02:00:00

#QUARANTINE
"Configure Quarantine removal"
Set-MpPreference -QuarantinePurgeItemsAfterDelay 60

#Applicationcontrol
"Configure potentially unwanted apps in audit mode"
Set-MpPreference -PUAProtection AuditMode

"Enable network protection mode in block mode"
Set-MpPreference -EnableNetworkProtection Enabled

"Configure additional network protection for servers"
Set-MpPreference -AllowNetworkProtectionOnWinServer 1
Set-MpPreference -AllowNetworkProtectionDownLevel 1
Set-MpPreference -AllowDatagramProcessingOnWinServer 1

#Defender for Endpoint
"Defender Latency"
Set-ItemProperty -Path "HKLM:\SOFTWARE\Policies\Microsoft\Windows Advanced Threat Protection" -Name "latency" -Value expedite -Force
More information: Set-MpPreference PowerShell Cmdlet
Firewall configuration and additional configuration (SmartScreen, Attack Surface Reduction, Windows Firewall) will be explained in the next part. Performance troubleshooting and testing will be included in one of the latest parts.
Conclusion
Part4A of the Microsoft Defender for Endpoint series is completed – focussed on the explanation of the Defender AV policies. In the next part; 4B, more information will be shared about the additional policies scoped on SmartScreen, Attack Surface Reduction, Windows Firewall, and additional settings.
Searching for specific Defender for Endpoint information? Use the contact submission form and share the post ideas or contact using Linkedin or Twitter. I will take all suggestions into the Defender for Endpoint series and help the community as far as possible.
View next part – Attack Surface reduction and additional protection – Part4B
10 Comments
Leave a Reply

Excellent content Jeffrey! Thank you!
Thank you Jeffrey, do you have any suggestion on the “Allow Intrusion Prevention System” setting in Intune policies? I can’t find any guidelines on this setting.
Hi Mark,
Allow Intrusion Prevention System seems removed from the Policy CSP. Not sure of the policy is still working.
https://learn.microsoft.com/en-us/windows/client-management/mdm/policy-csp-defender#defender-allowintrusionpreventionsystem
Hello Jeffrey. Thank you for such great content.
Regarding:
“Common mistake; Sometimes customers slow downs the frequency of the updates for “skipping” bad updates. Microsoft pushed immediate corrections when there are huge issues. With rapid frequency; the update is asap fixed with the newly released update. When configuring 48 hours; it takes hours before the fix is applied.”
I was wondering if you still find that it’s best not to “delay/slow down” defender signature updates, even after what we have seen today with the “”Block Win32 API calls from Office macro”” ASR rule misbehave.
Thank you!
Hi,
Yes, it depends on the environment – all in general the 1Hour signature update interval is still recommended. The ASR issues was indeed breaking, all this was not “fixed” when the interval was configured on 4H.
It is not a great idea to make the frequent slower for security updates.
Thanks, Jeffrey.
Which portal does one use to configure AV exclusions for Defender for cloud/server servers i.e servers that were onboarded with Azure Arc with the MDE integration?
How would I enable the following settings for Server OS via GPO?
AllowNetworkProtectionOnWinServer
AllowNetworkProtectionDownLevel
Hi Andre,
Happy to help and send the GPO path via mail including some pictures of the path and configuration. Can you mail me (contact@jeffreyappel.nl) or reach me via Twitter/Linkedin?
Hi Jeffrey,
Thanks much for this post its really helpful, but Still my environment requires full scan on weekly basis. When I try to implement the full scan policy the policies are conflicting with scan parameters, may be because of quick scan is running every day. Do you have any suggestions how to make quick scan everyday and full scan weekly once?
This is a common problem and I can see now way of fixing it. Normally if you make a setting the same and/or set to not configured conflicts are fixed. But you cannot do this on the scheduled scan time and update interval. Be good to get some more eyes on this